Showing posts with label beads. Show all posts

Friday, July 29, 2016

Book review: Quick & Easy Stitched Jewelry

Three years ago, I reviewed Cathy Jakicic's book, Jewelry Projects from a Beading Insider.  That link takes you to my review, which includes how to pronounce her last name.  :)  When Cathy approached me about reviewing her newest book, Quick & Easy Stitched Jewelry, I jumped at the chance.  The projects in her last book were so cute and versatile, and I couldn't wait to see her new book!

Here's the cover:


Ooh!  Just these few projects are so cute, and I can already imagine experimenting with the components.

Here is how Cathy described her book:
In a nut shell, there are 20+ bite-sized stitching projects of components that can be worked into simple — or more involved — jewelry.  Also, I’m making all the projects and instructions copyright free so someone can sell what they make or teach a project with my blessing.

The audience includes stitching novices, more advanced stitchers looking for a quick project idea — or something they can sell at a lower price point because it didn’t take them an age to make.
Wait... what did she say about selling?  Everyone knows that selling pieces made from another designer is verboten, but Cathy is giving you carte blanche on everything in this book.  You can tell how impressed I am because I sprinkled German and French in that last sentence.  Das ist wunderbar!  C'est magnifique!  That's wonderful!

Why would Cathy do this?  Again I turn to her words, this time from the book's introduction:
And while I would never support teaching or selling someone else's designs without their permission - everything in this book is yours.  I don't sell my jewelry or teach very often, so you're not threatening my livelihood.  These designs were designed for sharing.  Enjoy!
There's even a royalty-free statement on the copyright page.  Personally, I would still tell people where I got the ideas from if asked.  Give credit where credit is due and all that.

Now let's talk about the projects!  Each one has loads of possibilities.  Just those on the cover spark a bunch of ideas in my mind.

The top picture shows a snippet of a necklace, but that could easily be a bracelet.  The project's instructions explain how to make the beaded bead using pinch beads (Can you say "pinch bead beaded bead" ten times fast?) then how to create a chain necklace with bi-colored beaded beads as dangles along with matching earrings.  There's also a discussion of color choices and instructions on how to make the necklace shown on the cover.

What would I do with those beaded beads?  The first thing that pops to mind is a long chain necklace interspersed every few inches with sections of crystals and beaded beads on headpins with loops on either end.  I'd probably make two or three of those necklaces in different lengths and probably with different colors of beaded beads so they could be worn separately or together for a more dramatic look.

The other pictures on the cover show three different stitches.  The earrings are brick stitch over metal rings, and the instructions show a necklace and a bracelet as well as the earrings.  The bracelet has a number of square stitch components in different colors, and the instructions have charts for the different color combinations as well as charts for another multi-colored square stitch project.  The pendant is a peyote banner, and there's a chart for flower/vine placement as well as a chart for a thin banner that looks really cute in triplicate on a simple chain necklace.

As I'm sure you've figured out by now, every project has at least one variation, with many of them having two or more.  Here is an excerpt of the book Cathy said I could share:


The page on the left is the variation for "Circular logic," a cute project using two-holed beads.  I love how the end components have two thin chains coming off of them!  I'm definitely going to keep that in mind!  The page on the right is the beginning of the next project using peyote tubes as dangles on a chain necklace.  The variations for this project are a bracelet with lots of multi-colored dangles and simple pair of earrings..

If you're a beginner stitcher, this book is perfect for sampling a large number of different stitches and techniques.  Along with the ones I've already listed, there's right angle weave, cubic right angle weave, simple bead embroidery, adding stitching to a strung piece or around a larger bead, herringbone, adding fringe, working with two-holed beads, mixing chain and/or metal with beads, and more.  Wow - I nearly got out of breath there!

When you're learning a stitch or technique, it can be daunting to look at a full bracelet or necklace with nothing but that technique.  What if I don't get it?  What if I get halfway through and hate the stitch or the colors I chose?  What if I lay it down and don't pick it up again for months - will I remember how to finish it?  There's none of that in Cathy's book.  As it says right on the cover, these projects are quick and easy.  They're meant to ease you in so you learn something new, complete it in a flash, and have confidence to experiment.

For example, many people have told me that they're scared to try right angle weave (RAW).  The "Bicone Bands" project simplifies RAW - you make a strip, which is the simplest RAW to do.  There are charts to help you along the way.  Once the strip is done, you join the ends to form a little band (made with bicones, hence "Bicone Bands"), and slide them over large dagger beads.  You could do just two to get your feet wet and make earrings (see the variation!), or you could make the necklace as shown.  Then, once you're comfortable, you could take on a more complex RAW project like the "Dagger Snuggie" necklace variation:


There are charts for this as well, with numbered beads, helpful arrows, thread paths, and changes in color so you know which beads you've already worked with and which ones are new to this step.

The charts really are very nice.  They're a lot larger than you typically see in books, and they're very easy to read.  You don't have to take just my word for it, though.  My friend Angela, who is relatively new to beading, was over a week or so ago, and she wanted to look through my vast array of books for inspiration.  I chose a few that I thought were appropriate for her level, including Quick & Easy Stitched Jewelry.  I had an ulterior motive, of course, and asked her to give me her thoughts.  She really liked the projects, but right away she remarked that the charts were great and would be easy for her to follow.  Thanks, Angela!

Also, because Cathy's a Beading Insider, there are tips sprinkled throughout the book.  A few tips are on how to get "solid and stiff" beaded beads and components.  Another is on how to turn a component into a link.  A few are about choosing thread colors and when you might want to condition your thread.  A few of them are geared towards helping beginners make sense of what they're doing. And ...

I could go on and on because the more I flip through the book the more I find to write about.  Just know that there's lots more in the book for you to discover and enjoy.  You can find the book in beading or craft stores, or you can order from Amazon here.

If you'd like to keep up with Cathy, check out her BeadingInsider Facebook page.  If you're reading this from 7/29/2016 through 8/5/2016, you can see Cathy's Beads Baubles & Jewels episode (#2403) online here, and this season of BB&J will air on CREATE TV starting August 7, 2016.

Have I forgotten anything?  YES!!  Goodness, there's a lot to tell you!  The August 2016 issue of Bead&Button Magazine has a book excerpt!  They have printed the full instructions for the pinch bead beaded bead main project, "Beader's Dozen"!  You can see if what I said about the charts was true, learn how to make the beaded beads, and complete the chain necklace and earrings.  They've even included the tip on how to make your beaded beads stiff.  So check it out then get the book for all the rest of the projects!


Sunday, March 16, 2014

Blue wire-wrapped key

The Madison Art Glass and Bead Show is in less than a week!  Where did the time go?  I am going to be busy all week preparing, but I will not neglect you, my dear readers.  Most of the blogs will probably be about samples I'm making and other preparations, so you can feel like you're preparing with me (but without all the work).

Remember the red mixed bead wire-wrapped key I showed you earlier in the month?  I told you it was for the make 'n take event the Friday night of the show.  I still need to make instructions, so I took process shots as I made a blue version:


Now I'm all set to write the instructions!  Steve will help me cut wire, and I'm going to sit down now and bag beads.

Saturday, March 15, 2014

Polka dot earrings

After all the blogging I've done this week (including the challenge and instructions for the beads I'm about to show you), I need a quick one!  A truly quick one, not like yesterday's longer-than-I-anticipated quick post.

Today I made another Polka Dot beaded bead using the Pastel Light Sapphire Super Duos and the cream (#421) 11/0 seed beads to match one of my first samples.  Using the 11/0s means I can put a headpin through the middle and make quick earrings using my one-step looper:


I'm really looking forward to playing with these beads more and making lots of projects with them!  For full instructions on how to make the beads and the accompanying rope, click here.

Monday, March 10, 2014

Productive insomnia and new polka dot beads

My best time for designing seems to be in the wee hours of the night.  I don't know why - maybe it's because the house is quiet.  Maybe it's because I don't feel distracted by any number of things like I do during the day.  Steve would say that it's because my sleep cycle is off, and nights are my best time to work.

Whatever it is, many times if I start experimenting with beads late at night, I come out of it with a new design.  Last night, I hit the jackpot.  If I can get everything to work, that is.  At this point I have two very simple beaded beads designed and a possibility much more.  One is a very simple rope for bracelets or necklaces, and the others are flat variations that start with the same step as the others.

Since I'm not sure what's going to work and what isn't, I'm only going to show you the beaded beads.  I'm calling them "Polka dot beads" because they're all in threes and they're quick to make.  (If that doesn't make sense, check this wikiHow video out.)

Everything I made is with Super Duos and either 11/0 or 15/0 seed beads.  Super simple but cute (I hope)!

Here are the smallest beaded beads (15/0 seeds are on the left and 11/0s are on the right):


Here are the two larger beads:


The 15/0s look tighter, but if I use the 11/0s I can put a headpin through them:


That's all the time I have today.  I got sick of only being able to work in a 6"x6" area (again), so I've been cleaning off my desk.  More on this tomorrow if I'm successful!

Sunday, March 9, 2014

Good online sites for bead shopping

The Madison Art Glass and Bead Show is coming up in a few weeks, and I got to thinking that I really ought to have some kits for my newest design, Quadrille.  I decided to place bead orders now and kit them up if I have time and energy before the show.  If I don't, then I have a few months to do it before the Bead&Button Show Meet the Teachers Reception.

I had picked some colors out at Knot Just Beads and Funky Hannah's, but I didn't really find everything I needed.  In October I talked about the importance of supporting local bead shops, and all of those reasons are still valid.  However, when I'm creating kits, I need a bigger selection of colors.  Also, I need to buy in bulk and save as much money as I can so my kit prices don't get too high.

I've ranted before about choosing colors for kits online (rant #1, rant #2, brick stitch samples), and I don't want to complain about the same things again.  Steve suggested I posted the sites where I've found good deals and ask for the sites you use so we can all benefit.  He's so smart (and I'm not just saying that because he's waiting for me to finish blogging).

Here are some of the sites I've found in my online bead travels.  Keep in mind that my opinions are MY OPINIONS, and they're colored somewhat by the beads I've been looking for lately - primarily Super Duos, Rizos, and Thunder Polish crystals.

Super Duos and Rizos


Fire Mountain Gems is a great online resource.  They have "All Assortable Pricing", which means that you can save money by buying more.  It doesn't matter what you buy, if you buy 15 or more different items, you will save money.  Buy 50 different items, and you save even more.  Go crazy and buy 200 different items, and you save the most.  They have a lot of seed beads, Czech Fire Polished beads, and Swarovski crystals in a number of different sizes and shapes.  It's a great site full of inspiration (and their catalogs are excellent), but they don't have everything I need, like Rizos, Super Duos, and Thunder Polish crystals.  Oh - they give away goody bags at the Bead&Button Show, which is always fun.  Their pens are really good, too.

BeadCorp is a new site to me that I found while looking for Thunder Polish crystals.  Right now they're having a 45% off sale on Thunder Polish crystals, so I immediately went shopping (of course).  They have a large number of sizes and colors of the crystals, and I was able to find a few colors that I think will match Super Duos I found.  Speaking of Super Duos... They have a LOT of colors.  If I counted correctly, there are 95 colors on page 1, and there are three pages.  The prices are excellent, too - better than I've seen anywhere.  I placed an order today, so we'll see how fast shipment is and how good the beads are.  However, they don't have Rizos or seed beads.  Le sigh.

Goody Beads is a good site with a lot of Rizos (yay!), even though I had to go hunting for them.  They're listed under seed beads.  You'd think I could have just searched for "Rizo", but I got everything with a horizontal hole.  The prices on the Rizos are good, especially now when they're having a "Friends and Family" 20% off everything sale.  That goes through 3/11, so I recommend checking the site out.  They have volume discounts, too, but only for each item (not like Fire Mountain Gem's mix and match pricing).  You don't save a lot when buying in volume, but that is nice if you have to buy a lot of the same bead.  Every little bit helps.  They have a large selection of Super Duos, but their prices aren't as good as BeadCorp's.  There are a lot of seed beads, but I'm not sure if the numbers on the site are the "official color numbers"  I tried looking for a few beads I have, but I couldn't find them.  That's tricky on any site, actually.  Many sites assign their own numbers, which makes it hard to match up with beads you found elsewhere.  Oh - Goody Beads frequently gives little extras when purchasing, like right now the 20% off sale includes three cute lampwork owl beads.

Art Beads is another decent site I've purchased from in the past.  They have good sales from time to time (and have also given little gifts with purchase).  They have an okay selection of Rizos (when compared to the other sites) with smaller quantities (10g instead of 22 or 24g), so their prices are cheaper.  I would shop the sales and check per gram pricing to see where the best deal would be.  They also have an okay selection of Super Duos.  They also seem to have a really good selection of Miyuki and Toho seed beads, but I didn't go delving all that long in those sections.

Whimbeads is another site I've ordered from in the past.  Their Super Duo selection is a bit better than Art Beads, but the prices are little higher, and it seemed that a number of the items are out of stock.  There's a good selection of Rizos, and their prices are about like the other sites or a little bit higher.  They have a lot of peanut beads, and they have colors I've had problems finding on other sites.  They also have a really good selection of seed beads, and if I were looking for a particular color, I would probably shop here first.  Like a few of the other sites, they have volume pricing.  It's not as good as Fire Mountain Gems, but it's better than Art Beads.  The volume pricing is by type of bead, not just by one particular bead.  For example, if you get 15 or more tubes of multiple colors of peanut beads, you get the volume pricing.

Marilee Rockley recommends Bello Modo.  She said, "I like their selection of Vintaj and their steampunk buttons! They also have many kinds of beads and crystals."  Check out her steampunk tatted belt that she made with buttons from Bello Modo!

I think that's enough from me for now.  I could go on and on because I've had to do a lot of searching to find exactly what I need for my kits.  My best advice would be to check these and other sites for who has the colors you need, who has the best per bead/gram price, and who's running a sale (which would affect the per bead/gram price).  Wait - I think there's a song about this... "My mama told me... you better shop around"  Okay, no - it's about finding a good man, but the principle is the same for bead shopping.  "The beads'll come and the beads are gonna go, now..."

I'm getting loopy, and Steve is waiting, so...

If you have anything to add - either more information on any of these sites or of other sites you've ordered from - please leave a comment here or e-mail me at traci@creative-pursuits.biz.  I'll update this post as information comes in, and maybe we'll end up with a good list!


Saturday, March 8, 2014

Uncharted territory

Today I'll be talking about a different kind of creating.  I've had no time to physically make anything because I've been writing the instructions for the brick stitch hands-on project I've been talking a lot about over the last few months.

When I was writing the Quadrille tutorial and discussed everything that goes into it, I said that I prefer to take photographs of each step and annotate them like this one:


That works great when you're only printing 10-20 at a time, but for the Loose Bead Society, we'll be printing well over 100 copies, and full-color copies are expensive.  Hands-on instructions for the society use charts, so charts I had to make.

My first chart-making experience was a few years ago when we did a cross-weave bracelet.  I used Paint (Steve laughs at me whenever I use Microsoft Paint, but I'm very comfortable with it), and it was very simple to do.  Unfortunately I needed more complex capabilities, so Paint was out.

A lot of designers use Word for their charts, so I tried that first.  I was able to get the first drawing done, but then I wanted to label the tail thread.  I could not find a way to add text to the drawing!  That seemed very weird.  I must be missing something, but I looked and looked.  If anyone knows how, please leave me a comment.

Kathy told me that she did her last diagram in Serif's DrawPlus Starter Edition.  It's free, so I figured I had nothing to lose.  After about a half an hour of fumbling around with the pen tool to try to get nice curved thread lines, Steve did what I wanted to do in about 5 seconds.  I did not take that very well.  He has been using this kind of "vector" graphics program for decades (yes, decades) and in those same decades I was manipulating graphics pixel-by-pixel in MS Paint.  And here I thought I was graphics savvy.

Here's my/our first diagram:


Steve was all set to draw my charts for me (because he would be quicker and because of my Fibromyalgia-fueled frustration level), but after a day or so of me ruminating about it (and sleeping a lot) I wanted to give it another go.  It went much smoother, and I was able to make all of the charts myself.  Yay!

One thing I didn't like about DrawPlus is that sometimes when I exported a graphic in a GIF format, there was shading inside the circles.  It didn't happen with every drawing or even every time I exported the same drawing.  I got around it by exporting to a JPG format.  I know it's because the insides of the circles aren't transparent, but there really should have been some consistency.  Since it's disconcerting to see diagrams on a purple background, I'm using the JPG version, which has no transparency.

The other thing to keep in mind if using DrawPlus is that sometimes the settings change for no reason.  If I'm drawing a line using the pen tool, I'd like the settings to stay what they were for the last one.  Sometimes they are, sometimes they aren't.  It was the same with the DPI setting for exporting the graphics to GIF or JPG.  A few times it changed from 300 to the default, which was 96.

Here's another diagram:


And here's the last one, which is one of my favorites:


To see all the charts in between for how to make the earrings I've been showing you, you'll have to come to the LBS program!  (There's a $5 kit fee for guests, which is an excellent deal considering all you'll get.)

Thursday, March 6, 2014

Mixed bead wire-wrapped key

The Madison Art Glass and Bead Show is in two weeks!  Along with having a table selling my wares and teaching a class, I'm also participating in the make 'n take event on the show's Friday night.  This year my project is a wire-wrapped key using a number of different sizes of seed beads.  I bought some seed bead mixes from the Loose Bead Society in reds, blues, and greens/yellows.  

Tonight I sat down with a key, some wire, and one bag of the red mixed beads.  I took notes as I did the bail and the main part of the key, so I'm in good shape for writing up directions for the event.

Here's the key as it would look hanging from a necklace:


Here it is turned on its side so you can see the bail:


Along with examples like the above key, I'm also going to have examples of my stitched keys out.  It's a fun and easy project, and I hope the participants will enjoy it.

Wednesday, February 26, 2014

Pink cube bracelet and earrings

I'm saving all of my stitching projects for the LBS spring retreat, which is in just a few days.  There's no way I'm going to finish all of them, but it's nice to have options while I'm there.

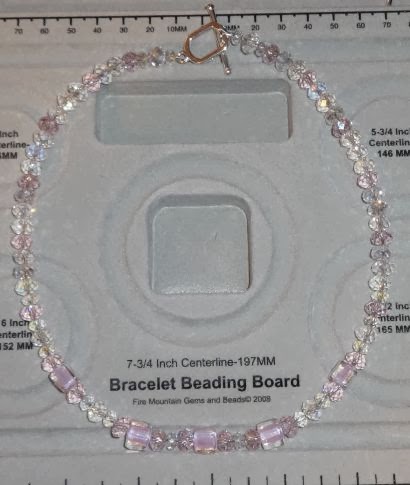
In my never-ending quest to use up supplies, I decided to make a bracelet to match the earrings I showed you on Saturday.  I pulled out my bracelet beading board that I acquired a few years ago and very carefully lined up just over 6" of beads:


With the clasp it would be around 7" long.  If you have never used a beading board (bracelet or necklace), here's the basics on how it's done - the middle is marked as zero with each inch counting out from there.  If you line up the beads right next to each other, as I did above, you know exactly how long the piece will be.  The ruts in necklace boards are curved, and there are usually multiple ruts so you can plan multi-stranded necklaces.  I'd show you a picture of mine, but it's currently AWOL.  Here are some examples of beading boards from Fire Mountain Gems:  the bracelet board I'm using, regular necklace board, long necklace board.

All the boards I've seen are flocked so beads won't roll around willy-nilly, but it's still hard to get the little buggers to line up correctly.  With round or cube beads it isn't quite as hard, but most of the beads I used are rondelles.  If they don't "sit up and fly right", I won't get an accurate measurement.  I nudged them with my fingers and with my Xuron 4 in 1 crimpers.

After stringing, I measured again, and it looks like I did a good job:


Here's the final bracelet after adding the clasp:


It may be hard to tell, but there are pink rondelles as well as clear ones in two sizes.  It's very subtle.

After making the bracelet I had 5 cubes left and possibly enough rondelles to make a necklace.  I decided the middle of the necklace would exactly match the bracelet, so I lined everything up on the right side of my board.  I then divvied up the rest of the beads to see if it was possible:


Hmm.  I had 5 inches of beads measured out with the corresponding beads in the middle circle.  So if the middle section is 6", the whole beaded part of the necklace would be 16".  The clasp would add about an inch, so that's 17".  I had to decide if that would be long enough or if I'd have to supplement with another type of bead.  Most people have skinnier necks than I do, so I decided that 17" was just fine.

Here's the final necklace:


I have to say again how much I love my Xuron 4 in 1 crimpers.  If you haven't read my review yet, check it out here.  I will say that the quality of the crimp beads is about as important as the crimp tool.  If you use cheap crimp beads, you're going to get a crappy crimp no matter what tool you use.  At the last Rings&Things bead show here in Milwaukee I picked up a package of their silver plated size 2 crimp beads, and they work like a dream.  If you're interested in purchasing the crimp pliers from me, I have two left.  Check out my Etsy listing.

When I was completely finished, I had yet another dilemma:


I had leftovers.  I've talked about this before - I really, really, really like using up all beads if possible.  I stared at the three stooges and grumbled to Steve.

He asked, "Why don't you make a dangle and add it to the bracelet?"

That was a great idea!  He had meant it for the center of the bracelet, but that would throw off my symmetry.  I've seen pieces with dangles at the clasp, so that's what I did:


I should have used a softer headpin for this - the wrapped loop was a little difficult.

Here's the final set, after I spent an unbelievable amount of time trying to get good pictures:


The best part?  I used up four types of beads!

As I was entering these into my inventory program so I could tag them for sale, I kept thinking that since the pieces are on the smallish side, they'd be perfect for teenage girls.  The fanciness of the crystals reminded me of prom, and that reminded me that the Loose Bead Society members donate jewelry for the Cinderella Project - an annual event where deserving girls receive prom dresses and jewelry for their big day.  After the girls choose their dresses, LBS members help them pick jewelry to match.  I haven't donated anything yet this year, so I decided this set might be appropriate.  I'm going to take it to the retreat and see if our Community Service Coordinator agrees!

Saturday, February 22, 2014

Pink cube earrings

I'm feeling a little better, but I sound a lot worse.  The coughing is still pretty bad, and if it doesn't start improving, I'm going to call the doctor on Monday.

I did a little bookkeeping work today, as I had another Etsy order (yay!).  I'm so far behind, so it's going to take a while to dig out.  I'm thrilled that my business has done so well this year, but it's a bit overwhelming to wade through my notes and make sure everything gets entered.

Today I made a very quick pair of pink cube earrings using the One Step Looper I reviewed a while ago.


I frequently get requests for daintier things, so I thought I'd bulk up inventory a bit while I'm under the weather.

That's it for me today.  Hopefully tomorrow I'll have something more interesting to show you.

Tuesday, February 18, 2014

Official brick stitch earring samples

This is going back to the hands-on program I'm running for the Loose Bead Society at our March program.  I've talked about it here, here, and here if you've missed it.

The beads for the kits have come in, and I made two samples for pictures - purple (because it's me) and green (because St. Patrick's Day is coming up):


While they're pretty, I wish there was more of a contrast in the middle section between the 8/0s and the Rizos.  When we picked out the colors, we scrutinized and scrutinized and discussed matte vs. translucent and dark vs. light, and we thought we came up with good choices.  I know I've discussed this here before about how difficult it is to choose colors in general and online.  You think things are going to look one way, then you start stitching with them, and it looks different than what you had planned.

Here are piles of the greens that are in the middle section:


The Rizos are a lot lighter "on paper" (literally in this case), but when stitched they blend into the much darker 8/0s.  Don't get me wrong, the end result is very pretty, but it's not the contrast I wanted.

The pictures don't really do the earrings justice - there is a lot of texture and movement, and I hope folks will be happy with them.

Up next - I write the instructions, the kits are made, we have table captain training, and then the program!  Lots to do!

Before I go, I'd like to show you what Steve brought home last night:


These are the Bead&Button Show 2014 "Purple Lupine Ottoman" commemorative beads made by Amy Waldman-Smith!  Since he works in the building, he was able to purchase them and bring them home.  He's so sweet!  I told him I wanted one, but he brought two home.  I think I'm going to make a necklace and a bracelet.  I absolutely love these - not just because they're purple (but that is a contributing factor, of course), but because of the clean lines and raised dots.  I can't wait to work with them!

If you'd like to order your own, click here, but don't delay, because these will sell out fast!


Thursday, February 6, 2014

Why you should take a class from Traci Otte

In the beading world I am relatively new and virtually unknown.  As such, my classes don't fill up like the ones taught by the big names.  Many times I have few or no students.  I market a lot (such as the list I wrote up on Monday), but it doesn't seem to be working.  There are a few reasons why that could be: my designs are boring, I'm a bad teacher, people aren't interested in stitching, or people are reluctant to take a class from someone who is "virtually unknown".  I understand stitching is at a lull right now, but there are many stitching classes that are selling out.  I know that my designs are interesting and that I'm a good teacher based on what people who are not family have told me.

So that leaves the last one.  Why would someone spend their hard-earned money to take a class from some woman named Traci Otte?  Yes, I'm speaking of myself in the third person right now so you don't forget which teacher you'll look up when this is all done.  :)

Let's start with introductions.  Hi, I'm Traci.  I have always been creative.  I started with latch hook rugs when I was little and worked my way up to cross stitch, crocheting, jewelry making, and knitting.  I joined the Loose Bead Society after moving to Milwaukee in 2008, and after I saw what the "big kids" were doing, I learned how to stitch.  After I left a computer programming job and determined that due to health reasons I couldn't continue in that career, I started my own business.  I now sell finished jewelry, teach, and sell kits and tutorials of my designs.

Now, why would you want to take a class from me?  Let's make a list.  I love lists!
  • I'm a good teacher.  Yeah, everyone would say that, but it has to be said, otherwise you get to the end of the list and think, "But is she a good teacher?  She never said."  I truly do my best to make sure everyone in my classes understands the material and is happy.  I also like to think I'm easy to talk to and that I foster a comfortable, fun class environment.
     
  • I give lots of tips.  If I discover something that makes the project easier to do, I'm going to pass that information on!
     
  • I make mistakes so you don't have to.  I've done everything from choosing colors with not enough contrast to forgetting to put the key inside the tube I've just started stitching up.  (If you're fond of train wrecks, check out my Mistakes and how I make them blog post.  There's a lot about knitting and crocheting in there, but it's a fun read.)  Whenever possible, I use that information in my tutorials and in my classes so you will hopefully avoid the heartaches I've had to endure.
     
  • Most of my designs are easily accessible by beginners.  I have a few that are intermediate, but the lion's share of them can be picked up by anyone who's never picked up a needle.  However, they still have appeal to experienced stitchers.
     
  • I give extras when I can.  If my design is for a bracelet, I frequently will include instructions for making matching earrings.
     
  • I'm international.  Last year at the Bead&Button Show's Meet the Teachers reception, a nice lady from Japan purchased the tutorial and kit of one of my designs, and recently someone from Sweden purchased a digital download of one of my designs on Etsy.  I feel so honored!
     
  • My designs have been published a few times, and one is in the works.  I'm not announcing that one until the ink is dry on the magazine so I don't jinx it.  For a list of where I've been published, check out the About page of my website.
     
  • For the last few years I've had a presence - teaching and/or having a booth - at three prominent bead shows:  the Milwaukee Bead Show hosted by Knot Just Beads in October, the Madison Art Glass and Bead Show in March, and the Meet the Teachers reception at the Bead&Button Show in June.  For a list of where I'll be at any point in time, check out my website.
     
  • I'm thorough (as you can tell from this list).  :)
Now that you know me better, I'd like to talk about my tutorials and kits for those classes where I'm providing the materials.

Tutorials:
  • Because I started designing shortly after I started stitching, my tutorials pay attention to every step so a beginner can easily follow along.
     
  • Related to that, I take notes as I design and make the first sample.  I make the second sample following those notes and make notes to the notes as adjustments are needed.
     
  • While making the second sample, I take photos of each step (called process shots) and annotate many of them with arrows and instructions.  The tutorials are printed in color so you can easily see what's supposed to go where.
     
  • In the back of each tutorial I include spots where you can keep track of everything surrounding the project you just made so you don't wonder, "Now, what color did I use there?"
     
  • The last page is lined for notes and has my full business card printed on it so you always have my information handy.  E-mail me or call me (preferably not in the middle of the night) if you have any questions!
     
  • I sometimes include goofy pictures or clip art.

    This is my "lawn chicken", Kirby, modeling my "StarLite Dots" necklace.
     
  • Most importantly, each design passes the "husband test".  My husband, Steve, is an associate editor for Model Railroader magazine.  He's used to step-by-step projects but doesn't know how to stitch.  If he says, "I could do that!" then the tutorial is good to go!  It also doesn't hurt that he's a whiz at grammar.  Between the two of us, nothing gets through.

And finally...

Kits
  • If I'm providing a kit for a class or for sale outside of class, you get everything but the scissors.  There's a needle and Fireline in every kit, and I include my business card so you know how to contact me if you need to.
     
  • With very few exceptions, I sell my kits separately from my tutorials, so if you want an extra kit from a class you've taken, you don't have the extra cost of another set of instructions.
     
  • I do my best to keep my kit prices reasonable.  I shop around for my materials to save me money, and I pass the savings on to you!
     
  • I provide enough materials to fit my "mutantly large" wrists and then some, so you should never have to worry about running out before you're finished with the project.  If you do, you have my phone number!
     
  • I provide a range of colors to choose from.

That last point leads me to today's project.  I've heard that classes with fire are pretty popular.  I can understand that - I've had fun with torches myself.  Unfortunately, though, I can't incorporate fire into my stitching designs.

Or can I?  For two of my designs, "It's Got Legs" that I'm teaching in Madison this March and "Cobblestone Path" that I'm teaching at the Bead&Button Show this June, I have a "fire" colorway.  Today I sat down with my leftover kit supplies and used every last one of my Rizos for that colorway to stitch this bracelet that is far too small for me, but it should fit a normal, slender person just fine:


So, are you "fired up" (sorry for the pun, but I had to) now to take a class with me?  You have many opportunities!

Since I want this post to be good for longer than the next 4 months, I'm not going to list all of my classes here.  Please check out my website for a complete list of every class I'm teaching and everywhere I'm going to be, and if you have any questions, please contact me at traci@creative-pursuits.biz.

I know this was long - I guess there's a lot more to me than I think!  Thank you for spending your time with me, and I look forward to seeing you in my classes and at my shows!  If you would like be added to my mailing list so you're kept in the loop, please sign up below:


Please keep me in the loop!

* indicates required
Send me information about...
Local to Milwaukee?

Tuesday, February 4, 2014

Star of David mini key for earrings

Almost a month ago I posted this about a Star of David key pendant I designed.  I mentioned that I modified the pattern to have two Stars instead of one because I couldn't shrink the pattern to have some white space at the end of the design.

I also designed a mini Star of David for the matching key earrings.  I knew I couldn't get the exact look of the Star in such a small area, but I thought I could "fake it" by having white nubs in the right places of the blue star.  Unfortunately, it just looked odd:


There's no telling what that is.  I took the nubs out, and it looks a lot better to me:


I think it's cute, and I hope it doesn't offend anyone!

Here is the finished key next to the finished Star of David pendant key:


I have also updated the graphic on my key information page, so that's finished until I design another holiday pattern.  Any requests?  Leave a comment here or e-mail me at traci@creative-pursuits.biz.


Look what I received in the mail today:


That's right - a sample of the Xuron split ring pliers!  I can't wait to try them out, and on Friday I will give a full report of the comparison between these and my "Bead Buddy" pliers I reviewed a week and a half ago.  Thanks, Xuron!

Thursday, January 30, 2014

Creepy eye key

Before I get started, I'd like to recommend that if iTunes wants to update your computer, don't do it right now.  I tried, and it messed iTunes up completely.  I know I'm not the only one based on what I saw in a forum.  On their recommendations I've uninstalled everything iTunes and Apple from my computer, and I'm about to reinstall.  I wanted to blog first, though.  There's something amiss in the iTunes update process, and if I were you I'd wait a week or more before trying it.


Onto the key!

Have you noticed there's a lot of eye jewelry around now?  I hate to say it, but I think they're creepy.  I feel like I'm being watched.  :)

My friend Tammy Rae Wolter is borosilicate glass artist.  I showed a picture of her studio in my Other folks' spaces, Part 3 blog post.  Among the many things that Tammy makes are glass eyes for jewelry (instead of for popping into an empty eye socket), and I always tease her that they creep me out.  Her pieces are beautiful, but they're watching me.  I just know they are.  If you'd like to see what she does, here's her website and Etsy shop.  If nothing else, click here to see just her eyes.

I must have made an impression, because when she did a presentation at a Loose Bead Society meeting in February, 2012, this was one of her slides:


Only a good friend would go out of her way to publicly creep me out.

Well, she must have made an impression on me, too, because when I was designing patterns for my large keys (the same batch as the rainbow key and iris key, which can be seen here) I decided to design a simple eye.  I stitched it up last night for the Gardens and Gears show I've been talking about:


In case you're wondering, there is a pupil in there.  It's just really small.  Steve says it looks fine, but if I make this again I'll either use a lighter color of blue or make the pupil bigger.  The iris could probably be a bit bigger, too.  In any case, it's sure to creep out anyone who I'm talking to, which was my goal.

Wednesday, January 29, 2014

Purple RAW bracelet

About a year and a half ago I posted this about a Right Angle Weave (RAW) set using wooden saucer beads and peanut beads.  Since then I've named it "Simple Stitched Saucer Set" because I seem to love alliteration.  I also have a "Double Decker Daisy", "Parenthetical Petals", and "Winter Wonderland".  I should have made all my designs alliterations.  I'll have to consider that for the future.

To refresh your memory, here's Simple Stitched Saucer Set in red and black:


I have kits for five colorways for this design, and I needed to make a purple bracelet for a super-secret-unless-you've-talked-to-me-recently reason.  I don't want to jinx it by posting it publicly.  Suffice it to say that I needed to make a purple bracelet, so last night while watching TV and the Cupcake kittens being born (live!) I made one big enough to fit me (because - PURPLE):


I have so many purple bracelets now that I need to grow extra arms (like in this movie) just to wear them.


It's been SO cold here in Milwaukee that I've taken to wearing my Snuggie in my studio, either in full "Snuggie" mode or as a blanket.  Currently it's sort of balled up in my lap.  When I get up, the Snuggie gets thrown on my chair.

The cats must be cold, too, because this is how I found Fe last night:


She wasn't completely "in-tented" as we call it - she LOVES being in "tents" - but she did a fair job of covering herself up!

Tuesday, January 28, 2014

Last brick stitch for a while... I promise!

You may recall my other forays into brick stitch.  If not (or if you're new here - welcome!), click here and here.  The second post is more pertinent to today's topic than the first one.  To recap, I'm going to teach a brick stitch project to the Loose Bead Society of Greater Milwaukee at the March program, and I'm trying to figure out what I'm going to teach.  I want something a little different than I've seen online, and I want to teach increases and decreases.

I got some supplies from Fire Mountain Gems and Knot Just Beads and finally was able to sit down with them last night.  I determined that the beaded bead idea will not work.  With increases and decreases it looked too odd and was getting to be too complicated and time-consuming.  So I simplified my original plan and stitched up two different colors with two different "bumpy" beads in the middle:


The stitched bit is attached at the top corner only so it will swing during wear.

I made a sample using 4 different kinds of "bumpy" beads - large (possibly Japanese) drop beads, Rizos, long Magatamas, and fringe (drop) beads:


While they're all neat, I like the Rizos (the 2nd row) best.  The Magatamas (3rd row) are look all cool and spiky, but you have to pay attention to which way you pick them up or they won't all lay the right way.  In that sample I had to take out two of the beads and turn them around.  That's not something I want to try explaining in a tutorial.

So, what do you think?  Do the earrings look like something you'd like to try?  Leave me a comment, especially if you're an LBS member.  I'd like the feedback!  Once I get final approval from the ones in charge, we'll start choosing colors and making kits.

Saturday, January 25, 2014

Rainbow key pendant

After I finished the gears and key necklace I posted about last night, my fingers were itching to pick up a needle and stitch something.  I know exactly what's going to happen when I stitch, unlike working with moveable, twisting around pieces.

A while ago I picked up a number of large keys.  The ones I usually design for are around 2" long, and these new ones are over 3" and a lot thicker.  I sell the large ones for $5 each with stitching suggestions (how big of a peyote strip to go around the key) and two patterns.  The patterns differ based on the key.  Some of them are abstract, and some of them have designs, such as an eye, hearts, or an iris:


I really wasn't planning on designing an iris, even though it's my favorite flower.  (There are irises all around the house, unfortunately for Steve.)  I was trying to design a fleur de lis, but an iris came out instead.  Because of the way the beads stagger in peyote, it's a little hard to design, especially in a small area.  When the iris started appearing, I said, "Fleur de what?"

One of the other challenges is designing a pattern that will line up in a tube.  I talked about this a bit when I showed you the Star of David key.  With designs like the iris, there's white space on each end, so I don't have to worry about the back of the tube.  One of my designs for the large keys has diagonal stripes in a rainbow pattern.  It looked like it would line up fine, but because I'm a bit neurotic, I'm never really positive until I've stitched it.

Since I'm "gearing up" for the Gardens and Gears steampunk show at Mitchell Park Domes on February 16th, I thought now would be a perfect time to stitch the key up.  It matched up perfectly (like I knew it would), and I think it's pretty cute!


If I were to do it again, I would want a brighter blue, purple, and green to better match the red, orange, and yellow.  I wanted to use what I had, though, and I think it looks fine.

If you'd like to purchase this copper key with the rainbow pattern, the silver one with the iris pattern, or if you'd like information on the other large keys and their patterns, e-mail me at traci@creative-pursuits.biz.  For you to stitch yourself, it's $5.  For one all stitched up as shown, it's $30.  Plus shipping and applicable taxes, of course.


Friday, January 24, 2014

Tool review: Split ring pliers (and gear and key necklace!)

As Steve said when he walked through the door, "It's Friday!"  It must be time for a review.  As I mentioned yesterday, I want to discuss split rings a bit more and show you split ring pliers.

The normal way to join components together is with jump rings.  They're easy to use, but if any of your components are thin, it doesn't take very much for the gap of the jump ring to work its way loose.  Next thing you know, your piece has fallen off, possibly never to be found again.  That's one reason I don't use jump rings in my strung pieces.

Sometimes, though, I don't have a choice, like when I wanted to join two components together in the earrings I made yesterday.  Here they are again:


Since the gear is so thin, I decided to use split rings instead of jump rings.  A split ring is just like a regular key ring.  Here's a 7mm split ring close up:


Just like when you're adding keys, you start at one end, wedge the component in the gap, and scootch it along until it reaches the other end.  They are clunkier than regular jump rings, but they're secure.  I know that it will take an explicit act to get the component loose from a split ring.  Normal wear won't do it.

You know how difficult it is sometimes to get a key or rewards card started in a key ring?  You dig your thumbnail in to separate the end, and sometimes it takes a few tries to get the key shoved in there.  I have scratched my fingernail, and sometimes my fingertips get sore.  Imagine doing the same thing with a 6mm or 7mm split ring.  It can be done, but it's difficult.

Fortunately, tool makers have come up with a solution: split ring pliers.  One end is straight and one end curves in to do the work of your thumbnail in separating the rings.


The one I bought is the Bead Buddy Split Ring Plier, and I bought it at a craft store (I don't remember if it was JoAnn Fabrics or Michaels) using my 40% off coupon.  Right now on the JoAnn website it's $9.99.  A number of manufacturers make them, including Craft & Jewelry (only $2.49 right now - usually $4.99 - on the JoAnn website) and Xuron ($12.47 right now on Amazon).  I'm sure there's a difference in quality between the brands.  If I was going to work with a ton of split rings, I'd probably look into the Xuron pliers.  I know Xuron makes quality tools (see my reviews for their Fireline scissors and 4 in 1 Crimper) and would want to spend the extra money.  Since I don't use split rings that often, I'm fine with my Bead Buddy brand.

Here's how it looks in action:


Once you get your component started, you can keep using the plier to help the piece around, or you can use another pair of pliers.  I like using my bent-nose pliers.  Either way, you'll probably need something when your component is at the end, because the split ring pliers don't grab.  They wedge and separate really well, but they don't grab.  You might be able to work it loose with your fingers, but I say just grab a pair of regular pliers.

The one thing I don't like about my Bead Buddy brand split nose pliers is that the black finish is coming off.  I would think that's natural because of the movement of metal on metal, but why would they put it on there in the first place?  It's unnecessary.  I'm just glad that the flaky finish isn't affecting performance.

A benefit of having these pliers around the house is that when you next need to add a key or something else to your key ring, these work perfectly.  No more scratched thumbnails!

One thing about working with split rings (with and without pliers) is that the rings can scratch, like it did on the right side of the yellow gear below:


On components without a coating like these gears have, you might not have any scratching problems.  It's something to keep an eye on.  Since I was unable to stop the scratching no matter what I tried, I decided it would be a "feature" of the necklace I made using those gears and keys:


I decided while working on this necklace that I'm happier stitching.  :)  I've heard that pieces with "movement" are good, but I keep having to turn things around to get the gears to lie flat.  This necklace is pretty, but it's not something I'll probably do again.  The best part is that I used all of the gears.  I've made a pair of simple earrings with the other blue and green keys, which leaves two purple (earrings for me!) and one yellow.  I'll find something to do with that yellow keys, I'm sure.