Showing posts with label new stitch. Show all posts

Saturday, September 4, 2010

A funky necklace

One of my favorite vendors at the Bead&Button show is Priscilla Marban.  The two times I've been at the show she's been all the way at the back of the vendor area.  She's well worth the walk, though.  Some of her beads and pendants are made with sawdust.  Yes, sawdust.  I show one of her pieces in my Matched Set blog post.  The picture doesn't do it justice.

She also has decoupage beads which were very cute and reasonably priced!  One of the ones I kept going back to and eventually decided to get was a long, rectangular bead with two holes depicting an Asian woman wearing a blue and purple kimono.  Almost right away I knew I wanted to do something different with this - one strand of purple and one of blue.

Looking through my trusty Mastering Beadwork book by Carol Huber Cypher I found a netting that I thought would look nice.  I experimented with a few color variations and decided a mix of purple and blue didn't look right.  I ended up using two different shades of each of the colors.  The lighter purple and blue were silver lined so they would stand out more.  I have another light blue that looks great with the darker blue (both of these were used in my butterfly challenge piece for the Loose Bead Society), but so close together you couldn't really tell a difference.

Off I flew to Midwest Beads again (they're the closest bead store to home, in case you haven't figured this out yet, and they have a great supply!).  As usual, they saved my bacon!  They're always so helpful and don't ever seem to mind my rambling.

After talking to Mary at an "artsy get together" that I go to once a month, we decided that it could be even funkier if the colors were flipped then flipped again.  I had never done a fringe before and decided to wing it instead of trying to find instructions.  My friend Michele had my Mastering Beadwork book, and that was the only place I knew for sure had fringe instructions.  How hard could it be, anyway?  The last thing I wanted to do was to go through all of my books and magazines (again) to find something.  I think it ended up okay, but they were sticking out some.  I made a little "ring" to hold them in.  Again, I made it up as I went along.

Wow - that's a lot of talking for one little necklace.  Why don't I just show you what I came up with?


This is pretty different than anything I've done before, and Steve didn't like it at first.  I nearly tossed it in the bin (I don't like making something he doesn't like) but I did wear it over a black shirt to meet Michele (who liked it, by the way).  When Steve saw it on a solid black shirt, he said he liked it better.  I was wearing something busy when I finished it and just put it on without changing.

I like the netting - it's pretty and goes together quickly.  I stitched 2 sections for each side and stitched them together.  I didn't think I could figure out how to start the stitch up again after the bead.  I did taper each of the ends, except where the fringe is, adding 3 beads to each of the ends to help the tapering along.

What do you think of my funky necklace?  Have you done anything funky yourself?  Send it to me (traciotte@att.net), and I'll feature it in one of my blog posts!


About Mastering Beadwork... Do you have this book yet?  If not, you should check it out - it has a number of techniques and projects, and I've found it a good resource!  It's spiral-bound, so it stays open while you're working.  Guard it around your friends, though, or you'll be texting Michele when the pictures you took with your cell phone don't give you enough information for a new technique you want to try!

Mastering Beadwork: A Comprehensive Guide to Off-loom Techniques

Tuesday, July 6, 2010

Embroidery in scrapbook pages

I'm working on a huge jewelry project for a challenge for the Loose Bead Society:  Metamorphosis - A Stage in the Life of a Butterfly or Moth.  I thought it was due in August, but I was recently reminded during the last Board meeting that it's due this month on July 19th.  Eeek!  I had an "Oh, poop!" moment which I bet I'll never live down.

So, there will be no new projects coming from me for a while.  Fortunately I have gazillions of finished projects I can pull from to show you and to explain what I did.

This project is a 2 page 8x8 layout about movies.  I used a few different film strip die cuts and stickers showing the title and popcorn (which is the best part of going to a movie, in my opinion).  Here's the layout:


To add another element, I decided to make a bucket of popcorn.  I made french knots using variegated yellow embroidery floss which perfectly shows the differences in color in a typical bucket of popcorn - some kernels have more butter than others (unfortunately)!

Here's a close-up:


There are some very good instructions on how to do a french knot on the feeling stitchy website.  There is a link on that site for a good video in case the instructions don't immediately make sense.  Sublime Stitching has another set of instructions that are great, and there's a link for lefties.

The one thing these instructions say is that you should not go back through the same hole when you pull the needle through to the back.  When you're working on paper, don't worry about it.  If you pierce holes too close together the paper will tear.  Just be careful not to pull too tightly, or your knot will pull all the way through, leaving ripped paper in its wake.

This is a great stitch to add some dimension to your pages.  Apart from popcorn, you can make flowers, dots, animals (see feeling stitchy and Sublime Stitching for cute examples), etc...

A lot of people are intimidated by this stitch.  Every one of the above links mentions this.  Don't let yourself be scared off - it's really not that hard.  Practice first on some scrap paper, and if you're really worried about ripping your background paper, plan your embellishment to be on a separate piece of paper (or even fabric!) and use really good adhesive like glue dots to adhere it to your page.

Send me pictures of your french knot creations, and I'll post a follow up here!

I would go get some popcorn now (that page made me hungry!), but I have to get back to my challenge piece...

Thursday, June 24, 2010

A matched set

Three of the pieces I got at last year's Bead & Button Show were beautiful pendants from Priscilla Marban.  The main component of the pendants is sawdust.  Yup - sawdust.  I can't even describe it... you just have to see it to believe it.  I have gotten so many compliments on these that I made sure to tell everyone where I got them and where her booth was this year.

Two of the pendants sat for a long time - months - until I figured out what I wanted to do.

I hung one of them on 5 strands of mixed purple seed beads.  I used a bead spinner to load 100 inches of beads then had to figure out how to separate them into 5 strands.  It was difficult (I don't think I knew what I was doing), but it's pretty!

For the second pendant I learned the spiral stitch.  It took a number of tries before I got the results I wanted... different stringing materials, the color and size of the core beads....and more.  It was a good experience, and I added about 4 samples to my sample tin.

Once I learned the peyote stitch, my first project was a ring to match this necklace.  Did I start with something easy like a solid color bracelet?  No, of course not.  I just had to make a ring with teeny-tiny seed beads with a pattern and embellishments.  Well, it worked out just fine!

So, after all that chatter:


I planned the focal piece of the ring to match the shapes directly to the left of the ring in the above picture.  The square was made with regular peyote, and the circle was made with circular peyote (big surprise, huh?).  As I did with yesterday's flower ring, here's a picture to show the size:


This ring is a bit bulkier than I'm used to, but it's pretty cute!

The third pendant I got from Priscilla?  It's still sitting there.  I'm having a problem finding something I need at a decent price.  I hate when I get something in my head and can't get it out.  :)

The sawdust pendants are not available on Priscilla's website, but you can contact her at priscillabeads@gmail.com to ask her about them.  She does have quite a number of beads and other pieces available on her site, so feel free to check her out!

This year I bought another sawdust pendant and a few of her decoupage beads.  Ideas are buzzing around in my head already, and I can't wait to see what I can come up with!

Tuesday, May 25, 2010

Starting Stitched Bezels

Recently I learned how to make bezels using the Peyote stitch.  I had seen a number of pictures in magazines but thought they were too ornate for me, but my friend Cindy from the Loose Bead Society showed me how easy it was to make bezels that better fit my personality.  The center doesn't have to be flashy or gaudy - you can bezel  basically anything flat-ish and round-ish.

While our husbands were playing Risk, we were in her craft room with polymer clay bicones that Cindy had made herself.  Okay, the husbands were playing Risk for only part of the time - we did have to start over because our first attempt was WAY too large for the shapes.


Here are a few pictures of the bezel so far - one of each side of the bicone - they're both so pretty!


For this bezel I'm going to keep it simple - I'm not going to embellish it at all.  I have started making a tubular peyote necklace with the green beads that I'll dangle this from.  While the bezel is started with tubular peyote, it's a much larger circle and is easier to figure out than doing a small-diameter necklace.  It's going well - I've done 2.5 inches of the necklace so far.  I'll post the completed project when it's done!

This has sparked interest in me to do other bezels.  Stay tuned!

Before I sign off I'd like to tell you about something I found online.  I got introduced to Fireline by my Loose Bead Society friends as great for stitching.  I found it for a really good price on Amazon a few months ago - $29.95 for a 300 yard spool of 6 lb line of the Smoke color.  Shipping was free!  I'm looking to get a spool of the Crystal color and noticed they have mail-in rebate offer if you get any 2 or more Berkley TEC tool, Classics tool, line, or bait.  If you've purchased any Fireline this year (and you still have your receipts) or if you plan on purchasing any, check out my link over there ---> for ordering from Amazon, and send in the rebate offer form.  You can get up to $15 back from Berkley!

Friday, May 21, 2010

Twisty-twisty tale

We're going to keep the mystery of the stamped clay discs for a little while longer, as I may be in need of a tube of Delicas before I can work on them some more.

In the most recent Bead & Button magazine there's an article, Layered Ladders, which is a modified ladder stitch and right-angle weave project which causes a really nice curvy piece.  I decided this was a perfect style to go with that coral crocheted sweater I showed you the other day.  It has a nice open neckline, and I didn't like anything I already had with it.

Last week I was at my friend Susan's house, and she had a tube of coral seed beads that seemed like it would match pretty well, and she didn't have a use for them.  So we sat down to figure out this new stitch.  The instructions were a little hard to decipher at first (there's a lot of backwards and forwards and at-an-angles), and after I figured it out I had a little difficulty getting the twists to form. The instructions say to use beads of different sizes to create the spiral, with the smaller beads on the inside.  It took a number of tries to get the piece to twist, but I didn't like how any of them looked.

I finally decided to use some irregularly-shaped white beads that I had used on a black and white twisted herringbone necklace.  You can see that on the Expand Your Horizons page on the Loose Bead Society website.  I'm not terribly fond of the beads, but I always wear the sweater with a white tank top underneath, and I thought the coral and white beads would go well together.

Lo and behold!  I got a twist!  The first few inches twisted nicely, but then it flattened out.  I figured it was due to the irregular nature of the white beads and started thinking of what I could do to make it more consistent.  In playing with the necklace, it seemed that if the white beads were "forced" to sit together nicely, the spiral would be tighter.  So I took another length of Fireline and started stitching just the rows of white beads together - kinda how they tape your little toe to the next toe when you break it.

Well, that worked like a charm.  I had to keep doing this every so often so I could test the length.  In the following picture you can see the fixed part at the top and the loosy-goosy part at the bottom:


Now, the loosy-goosy wouldn't be too bad if the white beads didn't look all cattywampus.  Here's a close-up shot:

In the top half you can see how I threaded the rows together.  I went around rows 1 and 2 a few times, then rows 2 and 3 a few times, etc...  That made everyone sit nicely, and due to the shape of the beads, the spiral tightened up.  I did not try to sew them together as I was stitching new rows - I used a separate thread to make sure that the main structure wasn't compromised.  Yeah - that's why I did that.  It wasn't at all because I couldn't think through how to do it while I was adding new beads.  Nope.  Not that at all.

When I was talking to Steve about this adaptation and asked if he thought it would work, he said, "All I understood was 'thread' and 'twisty-twisty'."  He was no help but was very encouraging.

Let me tell you... working on twisty pieces is very difficult.  The thread gets caught in the spiral, I had 2 or 3 dangly threads at a time, so they got all tangled, and measuring was near impossible.  So I kept stitching until I ran out of usable white beads and hoped that it would be long enough.


Voila!  It's a perfect length, it's very comfortable, and I think it goes quite nicely with the sweater.  That look in my eyes is the dazed-stitcher look that everyone gets at the end of a long project (and it's well after midnight).

I sure hope you really didn't want those coral beads back, Susan!  I damn near used them all!  If this necklace wasn't twisty-twisty, it'd probably be 3 times its length.

Thursday, April 8, 2010

Tale of a Toggle

Yesterday I mentioned the bracelet I made with a hole for a toggle.  This was something else I had to undo a number of times, first because of experimenting with the stitch (Peyote) and then because I didn't have enough purple beads to make the bracelet as wide as I wanted.  Finally, I finished a thin, sparkly Peyote bracelet and set to work on the toggle.

I was at a friend's house on Monday, and after I started the 6 bead long toggle the book suggested, she thought it would be too small for the hole and would easily fall out.  She suggested 8 beads, but I ended up with one 9 beads long.  Here's where my Mom says, "But you got a Math minor in college!  How can you not count, add, or subtract?"  Here's where I say, "It's not Linear Algebra!  Now please could you add my dice together so I can fill out my Yahtzee scorecard?"

It was a good toggle - nice and tight.  After sewing it on, we determined it wouldn't fit in the hole.  I had to take it apart because I didn't have enough purple beads for another attempt.  While dinner was cooking that night, I frantically ripped apart the 9 bead toggle and made an 8 bead one.  I wanted to get it done so I could wear it to the Loose Bead Society board meeting that night.  Here's the bracelet and the 8 bead attempt:


Believe me, the beads are purple.  Very subtle, but still purple.

It's getting close to the time when I need to leave for the meeting.  Does the toggle fit?  No!  Do I have any beads or buttons that will fit and would look nice?  No, of course not!  Oh, well.  The ladies will see the bracelet another time.

That's when I got the bright idea to bead a bead, leading to yesterday's discussion of the Penta-Petal bead.

Tonight I took another shot at it, this time with the clear beads used in the rest of the bracelet.  Since I did the whole numbered bead thing, I was able to do it in one attempt!  Say, that worked pretty well...  I'm going to have to try that right angle weave beaded bead again!

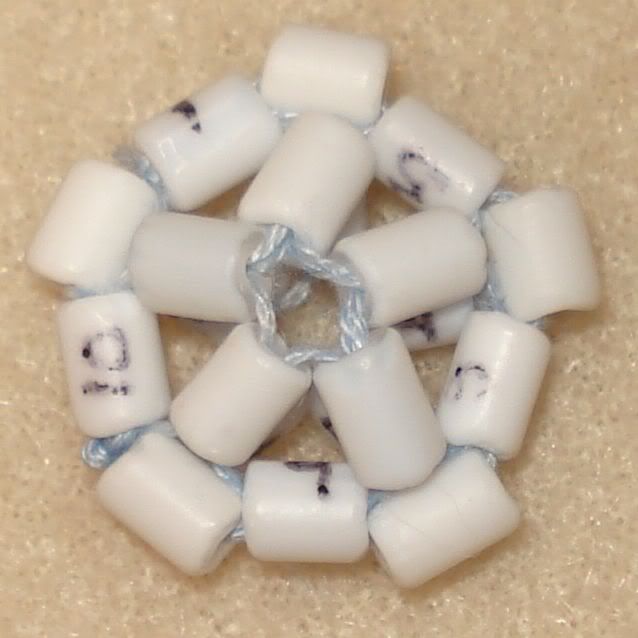
Here is the bead after steps 1 and 2, with the numbered one so you can see the size comparison:


I should have put a penny or something in there so you get a real size comparison.  And, yes, I know I need to get some clear Fireline.  Since the bracelet was pretty plain, Steve had suggested I add an embellishment to the top to liven it up.  I thought, "Why not have the toggle be that embellishment?"  I added some petal beads between the circumference beads (numbered 1, 5, 6, 7, and 10 above) but thought that looked too plain.  I then added more petal beads in the blank spaces and a purple bead for the center of the flower:


I flipped 'er over and added some beads to make a quasi-shank:


This didn't work quite as I had hoped because of the hex shape to the beads - the shank is a bit Pisa-Towerish.  Steve then asked the $64,000 question: "Will the bead fit through the hole?"  I did try it with only 5 petals, and I assumed it would work with 10.  I wiggled, shimmied, and twisted.  Then I wiggled, shimmied, and twisted the bead until it went through the hole.  It wasn't sewn onto the bracelet yet.  I decided to try, and if it didn't work, I would remove it and sew it onto the top of the bracelet and make another bead for the toggle.


So far so good!  Now let's try it on:


Whew!  That time it was easier.  I bent the petals up and worked it through.  The good thing about this is that this bracelet will not accidentally come undone and get lost.  Of course, will I be able to take it off?

I'm not 100% positive I like it.  I think it's because the petals move around a lot.  Steve says that it's organic, and some of my Loose Bead Society friends know I have difficulties with things that are organic.  The vast majority of my career has been pretty technical (as computer programmers are supposed to be), and I like symmetry and orderliness.  It takes quite a bit for me to "bead outside the box".  The Spring bracelet I posted about a few days ago was one of those I had to look at again and again before I decided I liked it.  Perhaps this will grow on me, too.

If I'm not able to get it off, it probably will grow on me!

Wednesday, April 7, 2010

Why NOT number them?

A few months ago we had a hands-on project at the Loose Bead Society to make a right angle weave beaded bead using Swarovski bicone crystals (with the crystals donated by Swarovski!!).  A number of us hadn't done that before, so we were each given a sheet of instructions in which the beads were numbered in the diagram.  Well, all of the beads were the same color, and I got very confused.  At one point I exclaimed, "Why aren't the beads numbered?!"

Fast forward to this week.  I am trying to make a toggle bead to fit through a hole I have already made in a peyote-stitch bracelet.  I thought I might try a beaded bead and found the Penta-Petal Bead project in the Mastering Beadwork book I have mentioned before.

Yup.  You guessed it.  The diagram has the beads numbered, and I got confused.  I was okay until Figure 7, which is where the beads kind of stack up to create the dimension of a beaded bead.  I ripped it out a few times then thought I should try it with bigger beads and embroidery floss so there would be less slippage.  I still got lost.

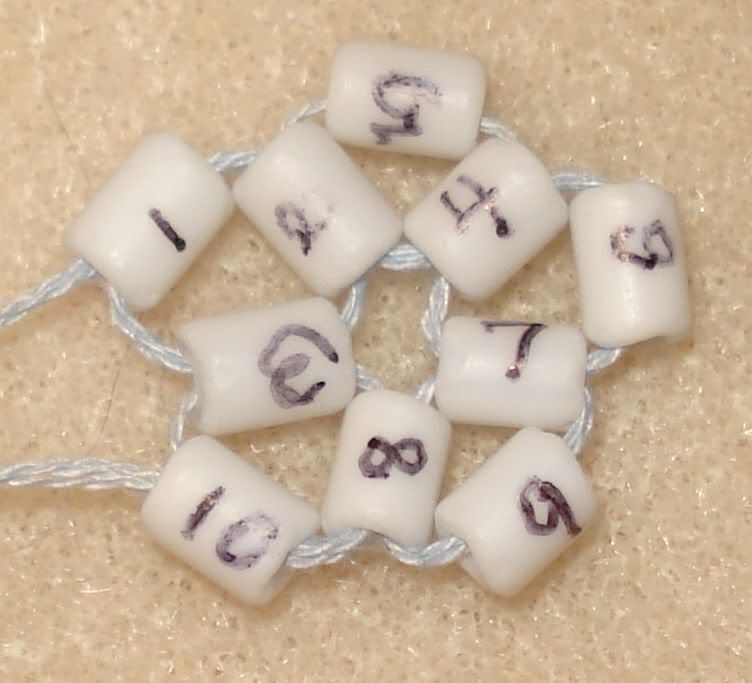
The beads I used are white cylinders with a matte finish.  The proverbial light bulb lit over my head, and I grabbed a Slick Writer pen.  For those who don't know, Slick Writer pens are great for glossy surfaces such as pictures, vellum, and any other slippery or possibly slippery surfaces.  They can be found in any respectable scrapbook or craft store with scrapbook supplies.  Use a Slick Writer pen to write on the backs of your photographs instead of a ball point pen.  There is no smearing, no indenting the paper so what you wrote is visible on the front of the picture, etc... I could talk for an hour on this.  Make sure you get a fine point pen - there are different widths.

What was I talking about?  Oh!  Beads.  Sorry - got off on a Slick Writer tangent.  I do that from time to time.  I grabbed my trusty fine point Slick Writer pen and numbered 10 beads.  After the first round of triangles, this is what I had:


Not the best handwriting, but they're small curvy beads.  Yes, there are triangles there - trust me.  I really wish the diagrams in the book had numbers for all of the beads instead of just the first 10, but using my handy-dandy numbered beads, I was able to complete the second step:


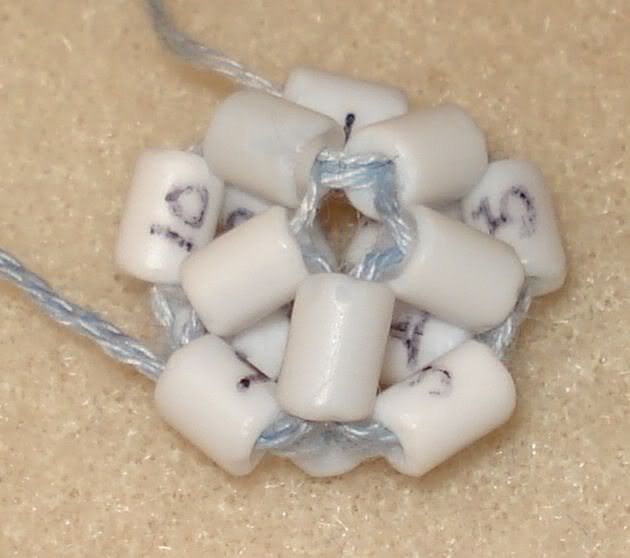
And finally, the last step:


I assume it's right.  It does look like the picture.  I may have to try this for all of the stitching projects that I get stuck on!

Now for making the beaded bead using the small 8 hex beads...  Stay tuned!

Friday, April 2, 2010

Color makes a big difference

We had spring in Wisconsin this week.  On Wednesday.  It was beautiful!  Then we had two days in a row that hit 80 degrees.  Well, it was nice while it lasted!  It's only April 2nd, so spring should be back soon.

In the last few months I have started learning to do bead stitching.  Previously I have strung beads (single or multi-strand) and worked with polymer and silver clay, but I thought that stitching was too difficult.  I've made some friends after I moved up here at the Loose Bead Society of Greater Milwaukee (check out our website at http://www.loosebeadsociety.org, of which I am the Webgoddess), and they have helped me overcome my "aversion to stitching".

On the recommendation of one of my new friends, I bought Mastering Beadwork: A Comprehensive Guide to Off-loom Techniques by Carol Huber Cypher. This book is really good at showing a number of stitches, including peyote (flat, tubular, and circular), herringbone (flat and tubular), spiral, square, etc... it just goes on and on.  You can find it on Amazon, and it's very reasonably priced!  It is spiral-bound, so you can leave it open while you work.  Very useful, unless a cat is sitting on it, which regularly happens in our house.

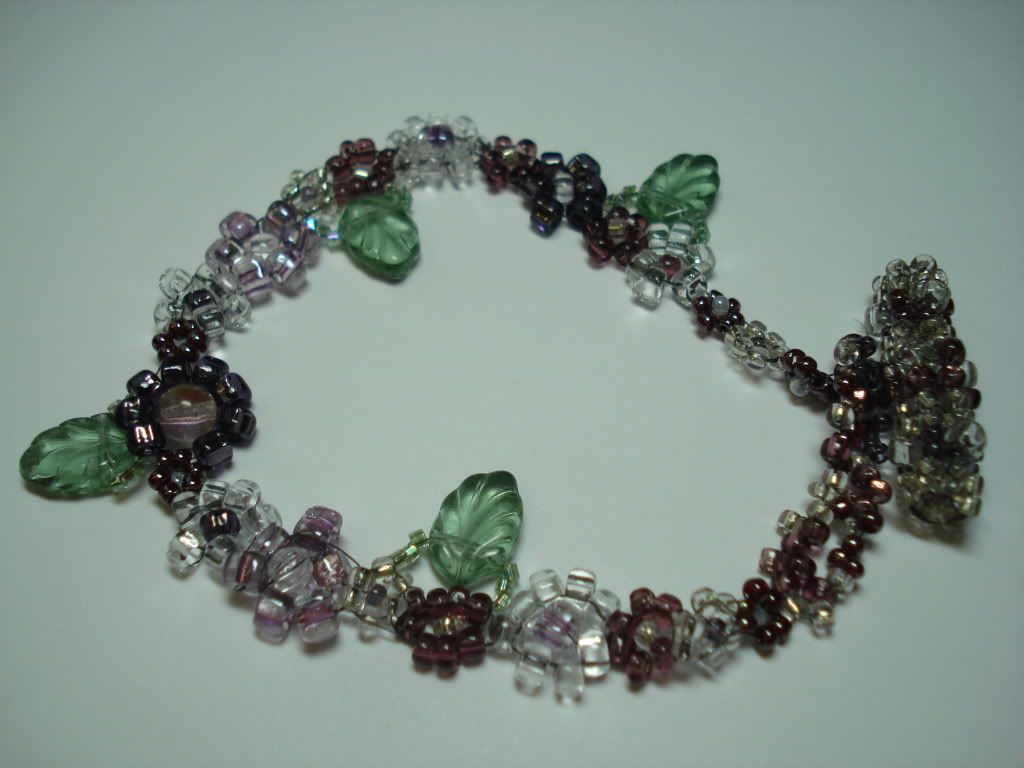
In the Daisy Chain stitch section I liked the idea of the Springtime Chain Bracelet but not the colors.  I'm pretty conservative with my color choices and have to really force myself to go beyond my norms: purple (in case you haven't noticed!), black, white, grey, silver, smoke... The bracelet in the book has BRIGHT colors: green, yellow, orange, peach.  That just would not do.  In the words of my dear, departed grandmother, "How would that look?"

I searched through my stash and even spent a few hours digging through a jar of bead soup to find just the right colors.  I had more sedate green leaf beads that I loved, and I found purples, clears, slightly metallic clears, and light greens enough to make the bracelet:


I had a bit of a problem with the toggle.  My first attempt was huge, and off it went into my "sample tin" of experiments with different stitches, the effect of using different beads, and what material was used.  This is a great idea, by the way, given to me by my same friend who suggested the book.  You should see her sample box!  Anyway, the second attempt worked better, and while it is still a little large, the bracelet stays on my wrist.

I was working on this at a bead retreat the Loose Bead Society had a few weeks ago, and everyone who saw it marveled at how different it looked from the picture, just by changing the colors.  All this by looking at the piece behind the project, if that makes any sense.  I frequently will pass by projects in books and magazines because I didn't like the colors that were used.  I am now going back through my magazines and marking those projects with the techniques that I want to try - colors be damned!

Do you have any similar stories?  I'd love to hear them and even see pictures if possible!