July has been an extremely busy month. On the 6th we had our entire HVAC system replaced. It was an oil furnace, and we switched to natural gas. You can imagine the amount of scheduling and planning all that amounted to! We had the oil tank removed last Wednesday, and we were extremely lucky that there were no leaks in it. For those of you who have never seen an oil tank before, here's ours:
That orange stuff is the plastic coating that they painted the tank with to help keep it from corroding.
We wanted to have all of the bushes removed because they were starting to die and look crappy, so while the guys were there with their big digger machine they just ripped them all out. Yay! We had those picked up a few days later. Now we have to decide what to plant there. I would like part of the area to be a raised garden for basil. I don't know if there's enough sun there, but we can give it a try. For the rest of it, we're thinking Dwarf Korean Lilacs.
On Friday night we got a new kitten:
Meet Clinchfield (Clinch for short, named after a railroad because that's what my husband likes to do), who was not getting along with the dog at his former home. He's almost four months old and is settling in pretty well here, except today he's hyper. We went to the vet, and they had to give him some meds for ear mites, then they had to give him some meds to relieve the pain and irritation of having his ears cleaned. They said it should make him a bit sleepy, but he's loopy and high instead. He spent some time pawing in the water bowl, splashing it everywhere. The vet assures me that he'll calm down. Soon, I hope. Pixel hopes so, too, because he's been getting jumped on a fair amount.
There have been other things going on, too. A Loose Bead Society rummage sale, a coupon workshop, a Loose Bead Society meeting, seeing Ant-Man at a private screening through my credit card (for free!!), and other stuff.
All this activity (along with bad allergies) is why I didn't blog last week. I don't really have anything to blog about this week, either, but I didn't want it to go another week.
I have been working on a few things, but nothing is complete. Here's a paw print bracelet with peanut beads that I'm making to match another one of my tops:
This next piece will have to remain a mystery:
It's something in process from my SDN15 technique. I'll show it to you when it's all done.
And when I was at my mother's this weekend I brought all this home:
Little silverware? Why? I keep seeing neat jewelry made with silverware on Pinterest (you can see the ones I like on my Flatware jewelry and other creations board) and wanted to give it a shot. I have a book with some flatware projects, and now I have some expendable flatware, so now I can! Most of these are my baby silverware, but there are a few other interesting things in there, including a spoon from Lucerne.
I'll keep you posted!
Now I must go. The kitten keeps going in the kitchen sink to get at the water bowl and the bowl stand. I've just taken the stand outside so it can dry, but he keeps going in the...
CLINCHFIELD! GET OUTTA THE SINK!!
I may have to sit on him.
Showing posts with label cats. Show all posts
Tuesday, July 28, 2015
Saturday, January 18, 2014
Quadrille earrings and another use for a heat gun
Even though today's Quadrille class was canceled, I still wanted to make the earrings and finish the instructions. I have done that, and all that's left to do with the instructions is proofread them and have Steve read them. Once he says, "I think I could do that," the tutorial is finished. (If you missed where I discuss the rest of the tutorial making process, click here).
Here are the earrings:
I think they turned out very well!
Remember I said one of the hardest parts of taking process shots was getting cat hair off of my mat? Well, this is how it gets there:
To be honest, I did hold his tail there to take the picture, but only after he had flicked it over my beads about 5 times. Pixel is very needy today. He started out on top of the back of my office chair, then he climbed down me to get to the desk (scratching my neck in the process), and now he's walking all over the desk. He has blocked my view of the screen several times (including right now), and he tried to eat my Doctor Who vampire's quarterstaff. I want him on my lap, but he seems content to wander around and mess with things. No, no, don't eat that Fireline.
I have one more topic for today. You know how I like my crafting tools to have multiple uses? (See the Doctor Who vampire's quarterstaff from yesterday and my video of using a circle cutter on wax paper for Christmas cookies from December).
Steve likes to use my heat gun (meant for melting embossing powder for scrapbooking) for non-scrapbooking purposes. He has used it to weld pieces of a broken laundry basket together and to fix dents in my fake leather jewelry displays, and today he used it to get some wrinkles out of a new bag set I got for free with a Woman Within purchase. The bags were very compactly folded, and when I straightened them out, there were so many wrinkles, and the bags wouldn't hold their shape well.
The material feels a bit like vinyl or plastic or something, so we didn't want to use the iron. Steve grabbed the heat gun and got quite a number of the wrinkles out.
It was neat to see the wrinkles vanish. It was like magic. There is one little scorch mark at a pretty deep wrinkle. Steve was being careful, but it was hard to see in there. So there's your warning: Heat guns run hotter than hair dryers. If you do "try this at home", be very careful that you don't burn yourself or the item you're working on.
I can't wait to use my new "weekender set" for the Loose Bead Society Retreat and for the Madison Art Glass and Bead Show!.
Here are the earrings:
I think they turned out very well!
Remember I said one of the hardest parts of taking process shots was getting cat hair off of my mat? Well, this is how it gets there:
To be honest, I did hold his tail there to take the picture, but only after he had flicked it over my beads about 5 times. Pixel is very needy today. He started out on top of the back of my office chair, then he climbed down me to get to the desk (scratching my neck in the process), and now he's walking all over the desk. He has blocked my view of the screen several times (including right now), and he tried to eat my Doctor Who vampire's quarterstaff. I want him on my lap, but he seems content to wander around and mess with things. No, no, don't eat that Fireline.
I have one more topic for today. You know how I like my crafting tools to have multiple uses? (See the Doctor Who vampire's quarterstaff from yesterday and my video of using a circle cutter on wax paper for Christmas cookies from December).
Steve likes to use my heat gun (meant for melting embossing powder for scrapbooking) for non-scrapbooking purposes. He has used it to weld pieces of a broken laundry basket together and to fix dents in my fake leather jewelry displays, and today he used it to get some wrinkles out of a new bag set I got for free with a Woman Within purchase. The bags were very compactly folded, and when I straightened them out, there were so many wrinkles, and the bags wouldn't hold their shape well.
The material feels a bit like vinyl or plastic or something, so we didn't want to use the iron. Steve grabbed the heat gun and got quite a number of the wrinkles out.
It was neat to see the wrinkles vanish. It was like magic. There is one little scorch mark at a pretty deep wrinkle. Steve was being careful, but it was hard to see in there. So there's your warning: Heat guns run hotter than hair dryers. If you do "try this at home", be very careful that you don't burn yourself or the item you're working on.
I can't wait to use my new "weekender set" for the Loose Bead Society Retreat and for the Madison Art Glass and Bead Show!.
Thursday, January 2, 2014
2014 Day 2: Beaded cat key earrings
If you missed my blog posts lately,
I am running a survey to know what kinds of things you'd like to read
about. My mother is still the only person who has responded. Please, please, please take the survey (you can access it here) and give me your feedback. I don't want to blog into a black hole. Thanks!
In keeping with the cat theme from yesterday, today I made some quick beaded cat key earrings. I love making things with keys, and I have enough keys in my studio right now to unlock every house in Milwaukee, I think. They wouldn't work of course, but you get the idea. Piles and piles of keys of all different shapes, sizes, and colors.
That doesn't stop me from buying more, though, when I find unusual ones at good prices. Michaels craft stores frequently have keys in their themed "dollar" sections. If I'm lucky, I can get them when they go on clearance, but I won't turn down paying $1 for a set of 4 keys.
The day after Christmas the "Rediscover" section had two different sets of keys, and I had a 40% off entire regular price purchase coupon. Woo hoo! I was honestly going to only get two cards of each, but then I took a good look at the littlest key:
Kitty! Love it, love it, love it! I did some quick calculating and decided to get 6 cards. Each card had one kitty key on it, so I needed two cards for earrings for me plus 4 more cards for 2 more sets to "bead up" and sell.
I wanted to do something quick today, so I just wrapped 28 gauge wire with 15/0 seed beads around and around the keys and up through the loop so the whole thing wouldn't slide down and cover the cat's tail:
I used gray because I want the earrings to go with pretty much anything I want to wear. Love them!!
In keeping with the cat theme from yesterday, today I made some quick beaded cat key earrings. I love making things with keys, and I have enough keys in my studio right now to unlock every house in Milwaukee, I think. They wouldn't work of course, but you get the idea. Piles and piles of keys of all different shapes, sizes, and colors.
That doesn't stop me from buying more, though, when I find unusual ones at good prices. Michaels craft stores frequently have keys in their themed "dollar" sections. If I'm lucky, I can get them when they go on clearance, but I won't turn down paying $1 for a set of 4 keys.
The day after Christmas the "Rediscover" section had two different sets of keys, and I had a 40% off entire regular price purchase coupon. Woo hoo! I was honestly going to only get two cards of each, but then I took a good look at the littlest key:
The key is really about 1.25" tall
Kitty! Love it, love it, love it! I did some quick calculating and decided to get 6 cards. Each card had one kitty key on it, so I needed two cards for earrings for me plus 4 more cards for 2 more sets to "bead up" and sell.
I wanted to do something quick today, so I just wrapped 28 gauge wire with 15/0 seed beads around and around the keys and up through the loop so the whole thing wouldn't slide down and cover the cat's tail:
I used gray because I want the earrings to go with pretty much anything I want to wear. Love them!!
Wednesday, January 1, 2014
2014 Day 1: Katy's Memorial
Happy January 1! If you missed my blog post yesterday, I am running a survey to know what kinds of things you'd like to read about. So far only my mother has responded, so even though I'm happy to get feedback from her, I need a little more input. If you'd like to participate, you can access the survey here. Thanks!
Today is the first day of my "resolution" to create something new every day. Not only am I going to experiment with new techniques and (hopefully) create new jewelry designs, but I am also going to work on my backlog of projects. At the end of the year, I hope I will have made a serious dent in the pile!
One of the projects I have been putting off is a memorial frame for Katy, our cat who passed away in August. You can read more about her at the end of this blog post. I decided that should be the first project of the new year. Yes, it's sad, but I like to think that it sets a good tone of love and remembrance for 2014.
When my first two cats, Perin and Simoon, passed away, they gave me clay casts of their paw prints. I have them both in my studio. However, when it was Katy's time, the vet said they didn't do clay casts but could make ink prints on nice cardstock.
We were grateful for anything, of course. When it arrived, her name and paw prints were underneath the Rainbow Bridge poem. We could have just framed the whole sheet, but I wanted to include pictures of Katy and to cut off the poem. It's a very sweet poem, but I really didn't want to have it hanging in my hallway. It makes me cry. :)
The other thing with the paw print paper (say that ten times fast!) is that it didn't have the date she passed away. We wanted to include that, so I looked through my rub-ons and stickers but couldn't find anything suitable. After running a few tests on plain paper, I printed the date right under her name. Fortunately the printer didn't jam! Whew!
I picked a cute paw print scrapbook paper out of the many, many cat papers I have. I also found a loving but cute cat quote out of the many, many cat embellishments I have. I put all that together with two pictures of Katy, and here it is:
Yes, that's Katy eating a marshmallow. It was quite amusing to watch!
In case you can't read it, the quote says: "No amount of time can erase the memory of a good cat, and no amount of masking tape can ever totally remove his fur from your couch. - Leo Dwarken" Considering Katy was a very good cat who shed on everything, I thought this was perfect.
The main reason I had been putting this project off is that I wanted something that Steve would think was special. Katy was his cat, and I didn't want to mess it up. Fortunately, when I showed the frame to Steve, he really liked it.
Today is the first day of my "resolution" to create something new every day. Not only am I going to experiment with new techniques and (hopefully) create new jewelry designs, but I am also going to work on my backlog of projects. At the end of the year, I hope I will have made a serious dent in the pile!
One of the projects I have been putting off is a memorial frame for Katy, our cat who passed away in August. You can read more about her at the end of this blog post. I decided that should be the first project of the new year. Yes, it's sad, but I like to think that it sets a good tone of love and remembrance for 2014.
When my first two cats, Perin and Simoon, passed away, they gave me clay casts of their paw prints. I have them both in my studio. However, when it was Katy's time, the vet said they didn't do clay casts but could make ink prints on nice cardstock.
We were grateful for anything, of course. When it arrived, her name and paw prints were underneath the Rainbow Bridge poem. We could have just framed the whole sheet, but I wanted to include pictures of Katy and to cut off the poem. It's a very sweet poem, but I really didn't want to have it hanging in my hallway. It makes me cry. :)
The other thing with the paw print paper (say that ten times fast!) is that it didn't have the date she passed away. We wanted to include that, so I looked through my rub-ons and stickers but couldn't find anything suitable. After running a few tests on plain paper, I printed the date right under her name. Fortunately the printer didn't jam! Whew!
I picked a cute paw print scrapbook paper out of the many, many cat papers I have. I also found a loving but cute cat quote out of the many, many cat embellishments I have. I put all that together with two pictures of Katy, and here it is:
Yes, that's Katy eating a marshmallow. It was quite amusing to watch!
In case you can't read it, the quote says: "No amount of time can erase the memory of a good cat, and no amount of masking tape can ever totally remove his fur from your couch. - Leo Dwarken" Considering Katy was a very good cat who shed on everything, I thought this was perfect.
The main reason I had been putting this project off is that I wanted something that Steve would think was special. Katy was his cat, and I didn't want to mess it up. Fortunately, when I showed the frame to Steve, he really liked it.
Tuesday, November 26, 2013
Purple Weekend and stamped curtains
Hi, all! Those of you who have gotten my newsletter and/or are my local friends on Facebook have heard plenty about my Purple Weekend open house (first blogged about here). If you've missed it and are in the Milwaukee area, feel free to take a look at my newsletter for information on this show and the other two I'll be at this holiday season.
Steve and I are cleaning like mad people, and I'm even getting to that shelf above my desk that has been a mess for a very long time.
Frisco has been helping create more of a mess ever since he started going up in my window sill. He likes to sit up here:
And flick things off of that little ledge when he isn't kicking them off trying to get up and down. All the things on the left side came down, then he stretched over to the right side and started flicking things off there. Then he decided to use my curtain as a hammock and take a nap:
Look at this adorable little face:
Wait. This is a craft blog, isn't it? Not a craft (cat) blog? Okay, then I'll tell you about the curtains Frisco is shown napping in.
They're regular off-white/natural curtains, and for some reason "cafe-style" sticks out in my head. I bought them when I lived in Waukegan for my craft room/office there. I took foam stamps and acrylic paint and stamped them. Yup, I stamp everything I can get away with.
Here's a better picture of one of the curtains when it was in my last house:
I stamped two curtains, and they both look about the same. You see the little splotches all over the place? If I remember correctly, I accidentally made a splotch and decided to "dot up" the rest of the curtain.
The words are "Inspire", "Laugh", "Create", "Love" (behind the bin in the above picture), and "Dream". The shapes are corners, moons, stars, flowers, swirls, cats (of course), and other miscellaneous things.
I had a really good time making them and am glad that I could hang them in my new home. Even though I can't see everything, they fit in with the style I want for my studio.
Now that I think about it, I can draw the curtains when the sun shines through in the late afternoon. Huh. I never considered that. I usually squint or leave the room.
Ahem. Anyway. I think this would be a good project you can do with your kids if you need to change their curtains. Don't need new curtains? How about a tote bag? Don't have kids? Well, that didn't stop me. I had a grand ol' time stamping away. It doesn't take too long, and if you're thrifty you can find the foam stamps at a good price. The paints aren't expensive, either. Just make sure you get washable paints if you're using them on fabric.
I gotta run. That shelf isn't going to clean itself (or it would have done so by now)! Happy Thanksgiving, and I'll see you local folks on Friday and/or Saturday!
Steve and I are cleaning like mad people, and I'm even getting to that shelf above my desk that has been a mess for a very long time.
Frisco has been helping create more of a mess ever since he started going up in my window sill. He likes to sit up here:
And flick things off of that little ledge when he isn't kicking them off trying to get up and down. All the things on the left side came down, then he stretched over to the right side and started flicking things off there. Then he decided to use my curtain as a hammock and take a nap:
There were little things all along this ledge. Flick, flick!
Look at this adorable little face:
He's lucky he's cute.
Wait. This is a craft blog, isn't it? Not a c
They're regular off-white/natural curtains, and for some reason "cafe-style" sticks out in my head. I bought them when I lived in Waukegan for my craft room/office there. I took foam stamps and acrylic paint and stamped them. Yup, I stamp everything I can get away with.
Here's a better picture of one of the curtains when it was in my last house:
I stamped two curtains, and they both look about the same. You see the little splotches all over the place? If I remember correctly, I accidentally made a splotch and decided to "dot up" the rest of the curtain.
The words are "Inspire", "Laugh", "Create", "Love" (behind the bin in the above picture), and "Dream". The shapes are corners, moons, stars, flowers, swirls, cats (of course), and other miscellaneous things.
I had a really good time making them and am glad that I could hang them in my new home. Even though I can't see everything, they fit in with the style I want for my studio.
Now that I think about it, I can draw the curtains when the sun shines through in the late afternoon. Huh. I never considered that. I usually squint or leave the room.
Ahem. Anyway. I think this would be a good project you can do with your kids if you need to change their curtains. Don't need new curtains? How about a tote bag? Don't have kids? Well, that didn't stop me. I had a grand ol' time stamping away. It doesn't take too long, and if you're thrifty you can find the foam stamps at a good price. The paints aren't expensive, either. Just make sure you get washable paints if you're using them on fabric.
I gotta run. That shelf isn't going to clean itself (or it would have done so by now)! Happy Thanksgiving, and I'll see you local folks on Friday and/or Saturday!
Tuesday, August 27, 2013
Successful Socks (plus Crochet-Along update)
Today will (hopefully) be a short post. I had insomnia last night, and I had to get up early this morning, so I'm very loopy, and it's getting late. I just spent a half an hour on my desk drawer (I got a new little organizer and wanted to get it OFF and INTO my desk). It's not all organized yet, but I found a number of interesting items in there. Perhaps I'll tell you about them sometime
I believe I've mentioned a few times that I've wanted to knit socks, and I posted about the Lion Brand Sockies slipper socks I made for myself. There wasn't a picture because they look all stretched out and baggy. :) Ages ago I purchased some actual, honest-to-goodness sock yarn, Patons Stretch Socks. As the name suggests, the yarn has a bit of a stretch to it. I figured that would help socks to fit me because I have (as I've mentioned before) duck feet and cankles. I wasn't really sure what pattern to use, but shopping in Michaels with Mom a number of months ago, there was a booklet called "Sweet to your Feet" featuring - you guessed it - Patons Stretch Socks! Mom bought it for me because she's very generous. I'm really not trying to butter her up... she really IS generous, especially in Michaels. Thanks, Mom!
If you're interested in seeing the patterns and possibly purchasing this booklet, click the above picture or click here to be taken to the preview page. There's a link there for buying it online. It's $4.95, and there's a PDF version for $3.95. I love PDF versions of books, especially crafts books. I load them on my iPad, and I never have to wonder where they are!
The one downside to that is that you can't make notes to PDFs in the Kindle app, and I had to make a lot of notes to the "Ankle Socks" pattern. I was able to figure things out and make adjustments, but I had to write it all in the book so I remember for the next pair I knit. More on that later.
See how cute they look on her skinny feet? Looks are a little deceiving here. See how her toes are pointed downward? That's so the socks don't bunch up at her ankles. Here are the socks I made, straight on and "profile":
Now, anyone who hasn't knit socks will think that this looks very odd, especially the right one. It goes straight out like a triangle instead of conforming to the foot. I was really worried about that, too, but then I saw this post all about sock knitting on knitty.com. They have a picture of a sock, and it looks just like mine, so I guess I did it right. That post covers all the basics about knitting socks and says everything I wanted to say about it plus a lot more. I highly recommend it to anyone who wants to knit socks but hasn't tried yet. The process really is simpler than it seems it would be. I followed the directions, and voila! Successful socks!
Now, I know I mentioned above that I had to make notes in the directions. Some of the notes were numbers of rows for different sections. It said, "Knit until heel measures 2 1/2 ins", and I know for this yarn and the size 3 needles I was using, that is 26 rows. I don't have to measure anymore. Same for how long the foot should be for my feet and stuff like that.
Other areas needed a bit more explanation. After scrutinizing the pattern for a long time at the first rearrange stitches section, I wrote my own instructions and drew a diagram. There are also a few things missing (or I just didn't understand the next instruction). I wrote notes on what to do in that case, too.
The one thing that was in common between this pattern and the Sockies was where the yarn ends up when you're done knitting and sew things up (which is called grafting). What this means is you have a bunch of loops on one needle and a bunch of loops on another needle, and you have to take a tapestry needle (big sewing needle) and sew the two together so it looks like it was knitted. The loops start out on three needles, but you're supposed to combine the loops on two needles onto one. Sounds simple, but the yarn is in the middle, and the grafting is supposed to start at one of the ends. It wouldn't make sense to just rearrange the loops so the yarn is at an end - the toe would be diagonal or perpendicular to the decreases, which would just be weird.
So since I have problems with spacial things sometimes because of the whole being left-handed-in-a-right-handed-world thing, I watched a number of videos on YouTube for the Kitchener Stitch, the most common toe-grafting method. One of them said to knit the stitches onto the needle with the other half of the loops (causing the yarn to end up where it's supposed to be), and I had a smacking-myself-on-the-forehead moment reminiscent of a V8 commercial.
(As an aside, those V8 commercials were really popular when I was little. When I was about three, Mom and I were in the grocery store, and I was riding in the cart. I saw the V8 display, smacked myself on the forehead, and cried out - really loudly, I guess - "I coulda had a V8!" Mom is still embarrassed about this.)
The booklet is worth trying out, even though I had a few problems. It could have just been me because I'm still a new knitter, spatially odd, and left-handed, but if anyone gets the booklet and wants my notes, let me know at traci@creative-pursuits.biz.
I mentioned recently (when discussing the Crochet-Along) that my mother is going into the hospital for cancer treatment. She's going in tomorrow, and the chemo is going to be really rough. If you have a mind to, I'd appreciate any nice thoughts, vibes, prayers, and juju sent her way. Aim it towards Chicago, and it should reach her. Also, if you'd like to verbally send your juju, leave a comment here, and I'll make sure she gets it. Thanks!
Anyway, I thought it might be nice to send her off with some nice new hand-knit socks, so I frantically worked on them (because, of course, I've known this was coming for months), and I brought them when we visited on Saturday. She loved them and was really impressed. I told her she shouldn't be - I just followed the directions - but I should have kept my mouth shut and let her be impressed. :)
Here she is in the socks:
I gauged. Remember in my review of Sweater Quest I mentioned gauging? Gauging sucks. Gauging is boring. Gauging uses yarn that would be better used on an actual project. Gauging looks weird after you've typed it five times.
Gauging also helps determine what size hook to use. My first gauge (with an N hook) I was a half an inch short because I crochet tightly. With a P hook I was a half an inch too big.
Here are both gauge swatches:
I didn't do the requisite number of rows on the bottom one because I knew it was going to be big, so why waste the yarn?
Here are the hooks:
The pretty blue metallic one is the N, and the not pretty (but very functional) gray plastic one is the P. You can see there's a huge difference in sizes. The N is 9mm, but the P doesn't say. The P only says "Korea" on it, excepting the "P" that was scratched onto the end by someone. Possibly me, but I can't remember. According to a Wikipedia article on standard crochet hook and knitting needle sizes, there's an M/N of 9mm and a N/P of 10mm. I've measured, and my P seems to match with this. Doesn't look like it's only 1mm bigger, though, does it?
I really wish there was a 9.5mm O hook - that would have been perfect. The swatch made with the N hook was nice and tight, but I didn't want that for this sweater. I wanted something a little looser, so I chose to use the P hook. Steve liked the tighter one because it would be warmer, but I don't want something that's going to be a SWEATER. I want a sweater. See the difference? I do, but that could be because I'm really loopy today. Ha! Loopy! I'm crocheting, and I'm loopy! I really need to wrap this up and go to bed.
Armed with this gauging knowledge, I started the sweater using the Large size instead of the X-Large size I had planned on making. If I had used the N hook, that wouldn't have been big enough, and I would have had to make the 2X. More crocheting = more time spent. Blech.
Steve has gone to bed. I don't have to rush. :)
While waiting for Steve's brakes to get fixed yesterday, I chained on the number needed for the Large and crocheted 3 rows. It was enormous. I measured it, and it was easily big enough for 3X, which I do not need. Since I want a XL, I figured I would go back two sizes and try the Small. That seemed to be wide enough, so I'm going with that. Steve said, "You just want to tell people you're wearing a Small!" Ha ha ha, husband. Very funny.
I was at the repair shop long enough to eat lunch, crochet the enormous first attempt, rip it out, start the second attempt, and play a partial game of checkers with a little boy on my iPad before he had to leave, and chat with someone who was there even longer than I was. I was able to crochet 5 1/4"! That may sound like a lot, but remember I'm using a very large hook and that crocheting is faster than knitting.
Here's what I have so far, after crocheting a little more tonight:
It's going pretty well. There are decreases at either end, and because the FPDC ribbing skips a stitch I got a little confused once. I thought I hadn't done the decrease and did one, then a few rows later I realized I had done the decrease but was crocheting into a skipped stitch. I then added a stitch, and no one will notice. You can tell if you really look, but it doesn't screw up the look of it at all, since it's such a gradual decrease.
I've measured the width again, and it seems to be a bit short of the XL width, but it should be okay. I think. My bust size is in between L and XL, so I'm hopeful it'll fit fine. If not, it just won't close all the way. It's not meant to anyway, so there shouldn't be a problem. I'll stop doubting myself now.
Now that I've finished with gauging, I'm letting Frisco play with one of the swatches in an attempt he'll leave the sweater, my earrings, a spool of wire, and everything else on my desk alone.
Okay, so I'm incapable of writing a short post, even when I'm really tired. I hope you all don't mind!
The good thing about last night's insomnia was that I now have a new jewelry design. It's perfect for a bracelet right now, but I'm hopeful I can make a necklace and earrings as well, and the tutorial and maybe some kits should be ready for sale at the Milwaukee Bead Show in October! It uses some of the same beads as the other designs I talked about in my recent rants (check out Kits rant #1 and Kits rant #2 to refresh your memory or to catch up), so I don't have to worry about finding too many supplies. Yay!
I believe I've mentioned a few times that I've wanted to knit socks, and I posted about the Lion Brand Sockies slipper socks I made for myself. There wasn't a picture because they look all stretched out and baggy. :) Ages ago I purchased some actual, honest-to-goodness sock yarn, Patons Stretch Socks. As the name suggests, the yarn has a bit of a stretch to it. I figured that would help socks to fit me because I have (as I've mentioned before) duck feet and cankles. I wasn't really sure what pattern to use, but shopping in Michaels with Mom a number of months ago, there was a booklet called "Sweet to your Feet" featuring - you guessed it - Patons Stretch Socks! Mom bought it for me because she's very generous. I'm really not trying to butter her up... she really IS generous, especially in Michaels. Thanks, Mom!
If you're interested in seeing the patterns and possibly purchasing this booklet, click the above picture or click here to be taken to the preview page. There's a link there for buying it online. It's $4.95, and there's a PDF version for $3.95. I love PDF versions of books, especially crafts books. I load them on my iPad, and I never have to wonder where they are!
The one downside to that is that you can't make notes to PDFs in the Kindle app, and I had to make a lot of notes to the "Ankle Socks" pattern. I was able to figure things out and make adjustments, but I had to write it all in the book so I remember for the next pair I knit. More on that later.
See how cute they look on her skinny feet? Looks are a little deceiving here. See how her toes are pointed downward? That's so the socks don't bunch up at her ankles. Here are the socks I made, straight on and "profile":
Now, anyone who hasn't knit socks will think that this looks very odd, especially the right one. It goes straight out like a triangle instead of conforming to the foot. I was really worried about that, too, but then I saw this post all about sock knitting on knitty.com. They have a picture of a sock, and it looks just like mine, so I guess I did it right. That post covers all the basics about knitting socks and says everything I wanted to say about it plus a lot more. I highly recommend it to anyone who wants to knit socks but hasn't tried yet. The process really is simpler than it seems it would be. I followed the directions, and voila! Successful socks!
Now, I know I mentioned above that I had to make notes in the directions. Some of the notes were numbers of rows for different sections. It said, "Knit until heel measures 2 1/2 ins", and I know for this yarn and the size 3 needles I was using, that is 26 rows. I don't have to measure anymore. Same for how long the foot should be for my feet and stuff like that.
Other areas needed a bit more explanation. After scrutinizing the pattern for a long time at the first rearrange stitches section, I wrote my own instructions and drew a diagram. There are also a few things missing (or I just didn't understand the next instruction). I wrote notes on what to do in that case, too.
The one thing that was in common between this pattern and the Sockies was where the yarn ends up when you're done knitting and sew things up (which is called grafting). What this means is you have a bunch of loops on one needle and a bunch of loops on another needle, and you have to take a tapestry needle (big sewing needle) and sew the two together so it looks like it was knitted. The loops start out on three needles, but you're supposed to combine the loops on two needles onto one. Sounds simple, but the yarn is in the middle, and the grafting is supposed to start at one of the ends. It wouldn't make sense to just rearrange the loops so the yarn is at an end - the toe would be diagonal or perpendicular to the decreases, which would just be weird.
So since I have problems with spacial things sometimes because of the whole being left-handed-in-a-right-handed-world thing, I watched a number of videos on YouTube for the Kitchener Stitch, the most common toe-grafting method. One of them said to knit the stitches onto the needle with the other half of the loops (causing the yarn to end up where it's supposed to be), and I had a smacking-myself-on-the-forehead moment reminiscent of a V8 commercial.
(As an aside, those V8 commercials were really popular when I was little. When I was about three, Mom and I were in the grocery store, and I was riding in the cart. I saw the V8 display, smacked myself on the forehead, and cried out - really loudly, I guess - "I coulda had a V8!" Mom is still embarrassed about this.)
The booklet is worth trying out, even though I had a few problems. It could have just been me because I'm still a new knitter, spatially odd, and left-handed, but if anyone gets the booklet and wants my notes, let me know at traci@creative-pursuits.biz.
I mentioned recently (when discussing the Crochet-Along) that my mother is going into the hospital for cancer treatment. She's going in tomorrow, and the chemo is going to be really rough. If you have a mind to, I'd appreciate any nice thoughts, vibes, prayers, and juju sent her way. Aim it towards Chicago, and it should reach her. Also, if you'd like to verbally send your juju, leave a comment here, and I'll make sure she gets it. Thanks!
Anyway, I thought it might be nice to send her off with some nice new hand-knit socks, so I frantically worked on them (because, of course, I've known this was coming for months), and I brought them when we visited on Saturday. She loved them and was really impressed. I told her she shouldn't be - I just followed the directions - but I should have kept my mouth shut and let her be impressed. :)
Here she is in the socks:
I did warn you this was for the blog, Mom!
She doesn't have ankles, either, it would seem. :) She has bloating problems, so it's good that these socks will stretch for her, and the bright colors will hopefully cheer her up a little.
Crochet-Along update!
I have been busy busy busy! I'll keep this short, because Steve is waiting to go to bed, and I'm more verbose than I expected to be.I gauged. Remember in my review of Sweater Quest I mentioned gauging? Gauging sucks. Gauging is boring. Gauging uses yarn that would be better used on an actual project. Gauging looks weird after you've typed it five times.
Gauging also helps determine what size hook to use. My first gauge (with an N hook) I was a half an inch short because I crochet tightly. With a P hook I was a half an inch too big.
Here are both gauge swatches:
I didn't do the requisite number of rows on the bottom one because I knew it was going to be big, so why waste the yarn?
Here are the hooks:
The pretty blue metallic one is the N, and the not pretty (but very functional) gray plastic one is the P. You can see there's a huge difference in sizes. The N is 9mm, but the P doesn't say. The P only says "Korea" on it, excepting the "P" that was scratched onto the end by someone. Possibly me, but I can't remember. According to a Wikipedia article on standard crochet hook and knitting needle sizes, there's an M/N of 9mm and a N/P of 10mm. I've measured, and my P seems to match with this. Doesn't look like it's only 1mm bigger, though, does it?
I really wish there was a 9.5mm O hook - that would have been perfect. The swatch made with the N hook was nice and tight, but I didn't want that for this sweater. I wanted something a little looser, so I chose to use the P hook. Steve liked the tighter one because it would be warmer, but I don't want something that's going to be a SWEATER. I want a sweater. See the difference? I do, but that could be because I'm really loopy today. Ha! Loopy! I'm crocheting, and I'm loopy! I really need to wrap this up and go to bed.
Armed with this gauging knowledge, I started the sweater using the Large size instead of the X-Large size I had planned on making. If I had used the N hook, that wouldn't have been big enough, and I would have had to make the 2X. More crocheting = more time spent. Blech.
Steve has gone to bed. I don't have to rush. :)
While waiting for Steve's brakes to get fixed yesterday, I chained on the number needed for the Large and crocheted 3 rows. It was enormous. I measured it, and it was easily big enough for 3X, which I do not need. Since I want a XL, I figured I would go back two sizes and try the Small. That seemed to be wide enough, so I'm going with that. Steve said, "You just want to tell people you're wearing a Small!" Ha ha ha, husband. Very funny.
I was at the repair shop long enough to eat lunch, crochet the enormous first attempt, rip it out, start the second attempt, and play a partial game of checkers with a little boy on my iPad before he had to leave, and chat with someone who was there even longer than I was. I was able to crochet 5 1/4"! That may sound like a lot, but remember I'm using a very large hook and that crocheting is faster than knitting.
Here's what I have so far, after crocheting a little more tonight:
It's going pretty well. There are decreases at either end, and because the FPDC ribbing skips a stitch I got a little confused once. I thought I hadn't done the decrease and did one, then a few rows later I realized I had done the decrease but was crocheting into a skipped stitch. I then added a stitch, and no one will notice. You can tell if you really look, but it doesn't screw up the look of it at all, since it's such a gradual decrease.
I've measured the width again, and it seems to be a bit short of the XL width, but it should be okay. I think. My bust size is in between L and XL, so I'm hopeful it'll fit fine. If not, it just won't close all the way. It's not meant to anyway, so there shouldn't be a problem. I'll stop doubting myself now.
Now that I've finished with gauging, I'm letting Frisco play with one of the swatches in an attempt he'll leave the sweater, my earrings, a spool of wire, and everything else on my desk alone.
He's getting so big!
Okay, so I'm incapable of writing a short post, even when I'm really tired. I hope you all don't mind!
The good thing about last night's insomnia was that I now have a new jewelry design. It's perfect for a bracelet right now, but I'm hopeful I can make a necklace and earrings as well, and the tutorial and maybe some kits should be ready for sale at the Milwaukee Bead Show in October! It uses some of the same beads as the other designs I talked about in my recent rants (check out Kits rant #1 and Kits rant #2 to refresh your memory or to catch up), so I don't have to worry about finding too many supplies. Yay!
Tuesday, August 13, 2013
Same stitches, different beads (and a few updates)
Last July I wrote about a set of jewelry I made using the same bead but different stitches. The necklace was made with spiral stitch, the bracelet with Right Angle Weave (RAW), and the earrings with RAW beaded beads with a bit of a change. I get a lot of compliments on this set, and people look at me funny when I tell them it was easy.
When I bought those adorable vintage purply/gray bicones, I also picked up some vintage black bicones and frosted white oval-ish/bicone-ish beads. I thought they would look good together in a RAW bracelet, and yesterday I finally did it. I took a picture of it with the original purply/gray bracelet so you can compare:
I like the subtle and bold look the bracelet has, and it will go with just about anything.
Next I made the earrings. The challenge with making RAW beaded beads with these beads is inconsistency in sizes, especially with the black bicones. It took a few tries, but I got two that look to be the same size:
They don't look as compact and ball-like as the originals, but they have an interesting look to them. Instead of just nestling a bicone at the top and bottom of the beaded bead, I had to also add one in the middle for the black/white ones to give it a little more stability (and so you don't see the headpin through the gaps).
Finally, I'm working on a spiral rope for a necklace. It's not done yet, but I have enough of it done for you to see how it looks:
You can really see the spiral when using two colors like this.
Unlike the purply/gray set, the black/white set will be for sale. I'll be sad to see it go, but I have so many pieces with black, white, and gray that I won't miss it. Besides, I'll have enough beads left over to make a few more sets, I think.
Update #1:
The above set will be completed and out for my big sale of the summer, the Donna Lexa Memorial Art Fair in Wales, Wisconsin. It's from 9a - 4p, and it's sure to be a lovely time. I hope to see you there!
Update #2:
A few weeks ago I wrote about making jewelry for my friend Geri based on a shoe that she was to wear to be in a wedding (if you missed it, you can read about it here). I mentioned that Geri couldn't go to the wedding, but she was still thrilled with the jewelry. She wore the jewelry and the shoes (but with different clothes) to an Adam Ant concert, and she posted a few pictures:
I think she looks great, and I'm sure she had a great time at the concert. I'm so jealous. Thanks for the pictures, Geri!
Update #3:
This is a sad update, unfortunately. Last August I wrote about the passing of my cat, Simoon. (You can read about her here if you're interested.) She loved being on my desk and right in the middle of everything.
After a few months, Steve's cat, Miss Katy, wanted to hang out on my desk. She came up next to my chair and meowed at me. I lifted her on my lap, and after she had enough of lap time, she climbed up on my desk. She loved stretching out and pressing the Caps Lock key or the Escape Key (especially while I chatted with Steve on Facebook during lunch). I liked having her there because it made me a little less lonely that Simoon was gone.
You know what's coming... Katy was 20 years old. Her age caught up to her, and she started shutting down. Last Friday we took her to the vet where we said goodbye to her. We are both heartbroken. Steve had her since she was a small kitten, and I worked very hard to win her over since Steve and I started dating in 2007. I spent a lot of time with her: during the day with her on my desk or on her shelf in the kitchen, in the evening with her on the back of my couch (sometimes begging for food), and at night with her sleeping between our pillows after I brushed her. A lot of that time was spent petting her and telling her I loved her.
We will miss her terribly, but we have no regrets. We cared for her the best we could, and we knew she loved us as much as we loved her.
Frisco, our new kitten, is already taking up some of Katy's duties and is frequently keeping watch on the kitchen shelf as well as bothering me on my desk. He's even started sleeping with us for part of the night, and that helps somewhat. It'd help a lot more if he wasn't so playful (and so sharp while he plays)! He has time. Lots and lots of time.
When I bought those adorable vintage purply/gray bicones, I also picked up some vintage black bicones and frosted white oval-ish/bicone-ish beads. I thought they would look good together in a RAW bracelet, and yesterday I finally did it. I took a picture of it with the original purply/gray bracelet so you can compare:
I like the subtle and bold look the bracelet has, and it will go with just about anything.
Next I made the earrings. The challenge with making RAW beaded beads with these beads is inconsistency in sizes, especially with the black bicones. It took a few tries, but I got two that look to be the same size:
They don't look as compact and ball-like as the originals, but they have an interesting look to them. Instead of just nestling a bicone at the top and bottom of the beaded bead, I had to also add one in the middle for the black/white ones to give it a little more stability (and so you don't see the headpin through the gaps).
Finally, I'm working on a spiral rope for a necklace. It's not done yet, but I have enough of it done for you to see how it looks:
You can really see the spiral when using two colors like this.
Unlike the purply/gray set, the black/white set will be for sale. I'll be sad to see it go, but I have so many pieces with black, white, and gray that I won't miss it. Besides, I'll have enough beads left over to make a few more sets, I think.
Update #1:
The above set will be completed and out for my big sale of the summer, the Donna Lexa Memorial Art Fair in Wales, Wisconsin. It's from 9a - 4p, and it's sure to be a lovely time. I hope to see you there!
Update #2:
A few weeks ago I wrote about making jewelry for my friend Geri based on a shoe that she was to wear to be in a wedding (if you missed it, you can read about it here). I mentioned that Geri couldn't go to the wedding, but she was still thrilled with the jewelry. She wore the jewelry and the shoes (but with different clothes) to an Adam Ant concert, and she posted a few pictures:
I think she looks great, and I'm sure she had a great time at the concert. I'm so jealous. Thanks for the pictures, Geri!
Update #3:
This is a sad update, unfortunately. Last August I wrote about the passing of my cat, Simoon. (You can read about her here if you're interested.) She loved being on my desk and right in the middle of everything.
After a few months, Steve's cat, Miss Katy, wanted to hang out on my desk. She came up next to my chair and meowed at me. I lifted her on my lap, and after she had enough of lap time, she climbed up on my desk. She loved stretching out and pressing the Caps Lock key or the Escape Key (especially while I chatted with Steve on Facebook during lunch). I liked having her there because it made me a little less lonely that Simoon was gone.
You know what's coming... Katy was 20 years old. Her age caught up to her, and she started shutting down. Last Friday we took her to the vet where we said goodbye to her. We are both heartbroken. Steve had her since she was a small kitten, and I worked very hard to win her over since Steve and I started dating in 2007. I spent a lot of time with her: during the day with her on my desk or on her shelf in the kitchen, in the evening with her on the back of my couch (sometimes begging for food), and at night with her sleeping between our pillows after I brushed her. A lot of that time was spent petting her and telling her I loved her.
We will miss her terribly, but we have no regrets. We cared for her the best we could, and we knew she loved us as much as we loved her.
Frisco, our new kitten, is already taking up some of Katy's duties and is frequently keeping watch on the kitchen shelf as well as bothering me on my desk. He's even started sleeping with us for part of the night, and that helps somewhat. It'd help a lot more if he wasn't so playful (and so sharp while he plays)! He has time. Lots and lots of time.
Wednesday, August 8, 2012
Hidden treasure
I've been busy since I last posted, but not with anything new I can post about. I submitted classes for next year's Bead&Button Show - the six designs I submitted last year plus two new ones using twin beads. The other thing I have been working on was relabeling my finished pieces for sale. It was a lot of work, but I'm happy with the results. I think my consistent branding will look good at the Donna Lexa Memorial Art Fair I'm in next Saturday (August 18th). Something else occurred this weekend that I'll tell you about at the end of this post.
A number of my Loose Bead Society friends sell their work. We frequently talk about how to price, what to do with older items that haven't sold yet (keep plugging on with them or take them apart and try something different?), how to balance making the time-consuming yet gorgeous pieces with items that will more quickly sell, and how to set up our displays.
One person I always look to for neat displays is Brenda Schweder. Here's her business's Facebook page and her Etsy page for steel wire and her new "Now That's a Jig" wire jig. She's written three books, too: Junk to Jewelry, Vintage Redux, and Steel Wire Jewelry (every time I see her books at Barnes & Noble, I take them off of the shelf and put them facing front in the "special books" section). Whew! After all this I'd better get a commission!
Anyway. Brenda. I've posted about her and her studio before and the little bit I did to help her organize (you can read it here if you missed it). What she's very good at is getting cool vintage displays. She takes anything and makes a display out of it - old suitcases, old boxes, metal display shelves from some old store, and tons of things. A friend and I found wooden crates for her at a garage sale (originally for pears, I think), and they were perfect for her to put books in! We also found her a neat wooden tool case.
Since I haven't quite found my "niche" yet, I'm always on the lookout for functional but cool-looking displays. I've started using paper-covered boxes that I've found at Michael's, and Steve is making me wooden earring racks (which we'll be posting about soon). I have decent bracelet displays and a few standing necklace displays, but I have these horrid white spinner racks for the bulk of my necklaces. They're horrid because they easily tip over, and they don't nest very well, so I don't know how to store them.
Coming home from the grocery store today I was thinking about what I'm going to work on next - mini key earrings to match a black and purple necklace. Could I make a bracelet to match? Hmm... probably! How am I going to display these pieces so customers will know what all is available?
I pull into the garage, open the trunk, and for some reason look across the garage:
(I opened the other door so there will be more light over there.)
Do you see it? No?
Behind the ax is... I don't know what it is besides cool! And vintage! And free!
Anyone who has bought an old house knows there are hidden treasures everywhere. In my last house, there was a picture on some sort of metal with a cow. When I sell that house, that cow picture is coming home here, unless my renters have tossed it. In this house I've posted about the shelved closets and built-in desk in my studio (click here for the final studio-organization post - you can click through to the others from there). There have been many times where we thought, "Hey, it would be cool if we could..." just to find that there was a hook right there or a shelf or something. There's a laundry chute, a milk door, and two built-in china cabinets. And closets and shelves everywhere. The previous owner was an architect, and he designed this house.
Apart from neat built-ins, we have found a few other hidden treasures: old suitcases (I take one of the smaller ones with me to all-day bead events so I can put my feet up after I've emptied all the goodies out), records, and now this.... box?
I carefully extracted it and took it outside:
It's about 19" long, 5 1/2 " wide, and almost 3" deep. It was covered in cobwebs, scary-looking white nest thingies, and general been-in-the-garage-for-God-knows-how-long ickiness. My first thought was, "I'll ask Steve to clean it up for me!" My second thought was, "He'll roll his eyes at me." My third thought was, "I want to post about it, so I'd better do it myself!"
I got a few wet paper towels and carefully cleaned all the gross stuff out (and off of the back!). Outside. I even threw the paper towels away outside. Just in case there was anything still incubating in the scary white nest thingies. I brought it inside and washed my hands. I then went over it with a disinfectant wipe and washed my hands again. Because of my allergies, of course. Not because I was afraid of it or anything.
It's all nice and clean now:
Here's a view of the slightly beat-up side (which is what you want in a vintage piece, I think):
Now, what do I do with it? I could hang it on the wall and put stuff in it, but I think not. It won't be good for my original quandary about displaying sets, but... wait... KITS! This will be perfect for displaying kits at the Milwaukee Bead Show, and I bet I can come up with something to put in it at other shows, too.
I don't know why I didn't see it before, but I'm glad I did. I'll have to take another look at what's in the attic! What do you have in your house? If you find anything cool, send me a picture at traci@creative-pursuits.biz, and I'll post it here.
________________
Now, on to what happened this weekend. I've gone back and forth on if I should post about it or not. Many of my regular readers already know. Steve and I decided not to publicly post about it on Facebook, but should I post here? Yes, I think so. This blog is not only about what I do but also about how I do it, where I do it, and who I do it with. Thorns along with the roses.
Simoon passed away Saturday night. She had a large mass in and around her intestines that would have been more than difficult to remove, plus her spleen looked odd. We decided to not put her through that, and we held her when she went to sleep.
She was my companion for over 14 years, and she loved to be right in the middle of what I was doing. You've seen that in my chainmaille post as well as my studio posts. I looked through all of my pictures of her so I could post one you haven't seen. There were many where she was just hanging out or grooming, of course, but there were quite a number of pictures where she was on top of my supplies.
These pictures are "quintessential" Simoon:
Big, cat-sized open space on the desk, but she has to sit on the messy side!
Needless to say, I had to move on to something else. (This project was the altered book I made for Mom a few years ago. See the posts here: part 1, part 2, part 3, and part 4).
She had a ready, loud purr that made me content while I worked (when I eked out a space where I could work).
There is a more-than-cat-sized hole in my studio and in my heart. Pixel is doing his best to comfort me by sitting on my lap and jumping on my desk, but Simoon will be missed.
I have a blank book that I put quotes and poems in. I'll post about that soon. One of the things I love about it is a quote on the spine: "The soul would have no rainbow if the eyes had no tears."
On to happier things tomorrow.
A number of my Loose Bead Society friends sell their work. We frequently talk about how to price, what to do with older items that haven't sold yet (keep plugging on with them or take them apart and try something different?), how to balance making the time-consuming yet gorgeous pieces with items that will more quickly sell, and how to set up our displays.
One person I always look to for neat displays is Brenda Schweder. Here's her business's Facebook page and her Etsy page for steel wire and her new "Now That's a Jig" wire jig. She's written three books, too: Junk to Jewelry, Vintage Redux, and Steel Wire Jewelry (every time I see her books at Barnes & Noble, I take them off of the shelf and put them facing front in the "special books" section). Whew! After all this I'd better get a commission!
Anyway. Brenda. I've posted about her and her studio before and the little bit I did to help her organize (you can read it here if you missed it). What she's very good at is getting cool vintage displays. She takes anything and makes a display out of it - old suitcases, old boxes, metal display shelves from some old store, and tons of things. A friend and I found wooden crates for her at a garage sale (originally for pears, I think), and they were perfect for her to put books in! We also found her a neat wooden tool case.
Since I haven't quite found my "niche" yet, I'm always on the lookout for functional but cool-looking displays. I've started using paper-covered boxes that I've found at Michael's, and Steve is making me wooden earring racks (which we'll be posting about soon). I have decent bracelet displays and a few standing necklace displays, but I have these horrid white spinner racks for the bulk of my necklaces. They're horrid because they easily tip over, and they don't nest very well, so I don't know how to store them.
Coming home from the grocery store today I was thinking about what I'm going to work on next - mini key earrings to match a black and purple necklace. Could I make a bracelet to match? Hmm... probably! How am I going to display these pieces so customers will know what all is available?
I pull into the garage, open the trunk, and for some reason look across the garage:
(I opened the other door so there will be more light over there.)
Do you see it? No?
Behind the ax is... I don't know what it is besides cool! And vintage! And free!
Anyone who has bought an old house knows there are hidden treasures everywhere. In my last house, there was a picture on some sort of metal with a cow. When I sell that house, that cow picture is coming home here, unless my renters have tossed it. In this house I've posted about the shelved closets and built-in desk in my studio (click here for the final studio-organization post - you can click through to the others from there). There have been many times where we thought, "Hey, it would be cool if we could..." just to find that there was a hook right there or a shelf or something. There's a laundry chute, a milk door, and two built-in china cabinets. And closets and shelves everywhere. The previous owner was an architect, and he designed this house.
Apart from neat built-ins, we have found a few other hidden treasures: old suitcases (I take one of the smaller ones with me to all-day bead events so I can put my feet up after I've emptied all the goodies out), records, and now this.... box?
I carefully extracted it and took it outside:
It's about 19" long, 5 1/2 " wide, and almost 3" deep. It was covered in cobwebs, scary-looking white nest thingies, and general been-in-the-garage-for-God-knows-how-long ickiness. My first thought was, "I'll ask Steve to clean it up for me!" My second thought was, "He'll roll his eyes at me." My third thought was, "I want to post about it, so I'd better do it myself!"
I got a few wet paper towels and carefully cleaned all the gross stuff out (and off of the back!). Outside. I even threw the paper towels away outside. Just in case there was anything still incubating in the scary white nest thingies. I brought it inside and washed my hands. I then went over it with a disinfectant wipe and washed my hands again. Because of my allergies, of course. Not because I was afraid of it or anything.
It's all nice and clean now:
Here's a view of the slightly beat-up side (which is what you want in a vintage piece, I think):
Now, what do I do with it? I could hang it on the wall and put stuff in it, but I think not. It won't be good for my original quandary about displaying sets, but... wait... KITS! This will be perfect for displaying kits at the Milwaukee Bead Show, and I bet I can come up with something to put in it at other shows, too.
I don't know why I didn't see it before, but I'm glad I did. I'll have to take another look at what's in the attic! What do you have in your house? If you find anything cool, send me a picture at traci@creative-pursuits.biz, and I'll post it here.
________________
Now, on to what happened this weekend. I've gone back and forth on if I should post about it or not. Many of my regular readers already know. Steve and I decided not to publicly post about it on Facebook, but should I post here? Yes, I think so. This blog is not only about what I do but also about how I do it, where I do it, and who I do it with. Thorns along with the roses.
Simoon passed away Saturday night. She had a large mass in and around her intestines that would have been more than difficult to remove, plus her spleen looked odd. We decided to not put her through that, and we held her when she went to sleep.
She was my companion for over 14 years, and she loved to be right in the middle of what I was doing. You've seen that in my chainmaille post as well as my studio posts. I looked through all of my pictures of her so I could post one you haven't seen. There were many where she was just hanging out or grooming, of course, but there were quite a number of pictures where she was on top of my supplies.
These pictures are "quintessential" Simoon:
Big, cat-sized open space on the desk, but she has to sit on the messy side!
Needless to say, I had to move on to something else. (This project was the altered book I made for Mom a few years ago. See the posts here: part 1, part 2, part 3, and part 4).
She had a ready, loud purr that made me content while I worked (when I eked out a space where I could work).
There is a more-than-cat-sized hole in my studio and in my heart. Pixel is doing his best to comfort me by sitting on my lap and jumping on my desk, but Simoon will be missed.
I have a blank book that I put quotes and poems in. I'll post about that soon. One of the things I love about it is a quote on the spine: "The soul would have no rainbow if the eyes had no tears."
On to happier things tomorrow.
Friday, April 22, 2011
I'm so far behind!
Hi, all! It has been far too long since I last posted. I wanted to. I really did. I even opened up my blog in my browser several times to remind myself to do it. But things always get in the way, or my energy level is very low, or I'm on the phone for hours about something.
But today is the day! I'm awake before Steve comes home from work (that's been rare lately), and I don't have to get ready to go anywhere, so here I am!
Here's a brief update on what's been going on:
And now for something completely different.
When I last posted on February 2nd - Goodness! - I posted about having a winner for the Happy Things contest. I made Kathy a bracelet using a technique I came up with that I'm calling "Parentheses" based on how the outer beads curve around the inner one. Here's a picture of the bracelet on my new hand display in a picture-taking box-thing that my husband made for me:
I usually make this kind of bracelet with bigger beads, but I didn't have any in Kathy's color palette in my stash! This turned out nice, though. Very delicate and supple.
A number of you told me that you were "so close" to finishing your lists, but apart from my mother who came up with 90 items, no one sent me a list. That's okay - it's more important that you all started thinking about things that make you happy.
I won't post my Mom's whole list here, but here are a few highlights with my comments underneath like last time:
I also completed my list, and I made it to 100 items. I was all set to do a "word cloud" of my items (you can see examples and create your own here), but I couldn't find a way to do phrases - just words. If I could boil my list down to single words, I think a word cloud would be a great way to display the list. I may have to think more on that.
However, what I have right now is a spreadsheet. At some point I want to make a double layout scrapbook page of it, but I'm so far behind in my scrapping that it will have to wait. I think I'm up to Valentine's Day 2010. Eek!
Until I can get it into a nicer form, here are a few highlights from my own list which was finished before I got my new car:
Whew! Well, what I lack in number of posts I make up for in length!
But today is the day! I'm awake before Steve comes home from work (that's been rare lately), and I don't have to get ready to go anywhere, so here I am!
Here's a brief update on what's been going on:
- Mom's done with chemo and doesn't have to go back to the doctor until June! She feels much better and is even working part time.
- Mom and John bought me a car. My old one has almost 108,000 miles on it and is making rattly sounds. They know we can't afford it, and they want me to be safe. I got a Titanium (fancy word for dark gray) Kia Forte 5 door (fancy word for hatchback). Thanks, Mom and John!
- I've opened a store on Etsy. I'll have a link to it on the right side of my blog and eventually on my website, which needs to be changed because my business is not just web design anymore. I'm expanding it to include my jewelry and other "Creative Pursuits".
- I've been struggling with my health. I went to a new Rheumatologist (I didn't like my first one), and she said that she doesn't think anything serious is going on, but I do have Fibromyalgia which is affecting my whole body, not just the standard Fibro areas. The blood work hasn't come back yet, though. I've been starting to exercise, which is what I'm supposed to help me feel better. We'll see.
- Steve has been more supportive than ever, and I'm so glad to have him!
And now for something completely different.
When I last posted on February 2nd - Goodness! - I posted about having a winner for the Happy Things contest. I made Kathy a bracelet using a technique I came up with that I'm calling "Parentheses" based on how the outer beads curve around the inner one. Here's a picture of the bracelet on my new hand display in a picture-taking box-thing that my husband made for me:
I usually make this kind of bracelet with bigger beads, but I didn't have any in Kathy's color palette in my stash! This turned out nice, though. Very delicate and supple.
A number of you told me that you were "so close" to finishing your lists, but apart from my mother who came up with 90 items, no one sent me a list. That's okay - it's more important that you all started thinking about things that make you happy.
I won't post my Mom's whole list here, but here are a few highlights with my comments underneath like last time:
- John
(Her husband - did I mention spouses always seem to end up first?) - Traci
(Awww... Thanks, Mom!) - Steve
(I'm glad he made the list, but to be so high up is great!) - Being alive
- Traci taking me to Chemo and Doctor appts
(That's what I'm here for!) - Morning sun glistening on the fence
- Watching Traci being so kind and helpful to the people around us
(Now you're making me tear up, Mom!) - Smell of lilacs
- Magic Chute in bathroom (it produces clean clothes)
(Funny, I have one of those, too) - Being done with this list
I also completed my list, and I made it to 100 items. I was all set to do a "word cloud" of my items (you can see examples and create your own here), but I couldn't find a way to do phrases - just words. If I could boil my list down to single words, I think a word cloud would be a great way to display the list. I may have to think more on that.
However, what I have right now is a spreadsheet. At some point I want to make a double layout scrapbook page of it, but I'm so far behind in my scrapping that it will have to wait. I think I'm up to Valentine's Day 2010. Eek!
Until I can get it into a nicer form, here are a few highlights from my own list which was finished before I got my new car:
- Steve and everything he does for me
(This can fill up 3 lists or more on its own!) - Our house
- Living in Milwaukee
- Mom being healthy (this is a future thing!)
(This is future no longer... she's done with chemo!!)
(Before you ask, Mom, numbers 4-9 are Katy, Simoon, Pixel, Fe, Cappuccino, and Caegal.) - John taking such good care of Mom.
- The generosity of my in-laws
- The Wheel of Time series
(The last book in the series is almost out! Thanks, Brandon Sanderson!)
- The Loose Bead Society of Greater Milwaukee
- Running into new friends when I'm out and about
- Making Steve laugh
- People reading my blog
(Thanks!) - Going somewhere without my GPS (I always get lost in Milwaukee!)
- Simoon following (or leading) me to the bathroom
- Fe greeting me with a meow when I come into the room
- Pixel and his Papa together
- Katy hanging out with me on the couch
- How nice everyone in Mom's Oncology office is
- Speaking in LOLspeak
Whew! Well, what I lack in number of posts I make up for in length!
Thursday, April 29, 2010
Another tangent - what IS it about cats?
They have to be right in the thick of things, always. I'm in the middle of a project, and Simoon just has to be on top of it. Even when there's more than enough empty desk space, she decides to relax by balancing on papers, pens, and ink pads while pushing other things off of the desk. She's pushed a tasty Parmesan crusted stuffed chicken recipe off of my desk twice this week! (If you make this recipe, I would put the chicken under the broiler for a few minutes to brown the parmesan some.) Right before the following picture was taken, she knocked off a set of rubber stamps. She looks pretty comfy, eh?
Look at that huge cat-sized open space on the desk!
Speaking of tasty new chicken recipes from the Kraft Foods website, we tried the Chicken in Creamy Pan Sauce tonight. Next time, we're doubling the sauce and serving it with egg noodles. Very tasty!
It's not just when I'm crafting that the cats are pests. Earlier this week we had our oldest cat, Miss Katy, groomed. Her long fur was turning into huge clumps of felt again. Steve could not leave the couch that night - she was on him like white on rice. He made the best of it by reading.... until:
Pixel makes a better door than a window. At least he settled down:
Look at our poor Katy! I hate that they gave her a lion cut. I know it's best for her, but she looks so sad! Steve noted today that Katy has "Flashdance" legwarmers, and he made her do the "Maniac" dance. She was not amused.
Surprisingly, Fe (our youngest kitty) hasn't been a pest lately... Oh, wait, that's right. She knocked over a basket in the kitchen which nearly landed Steve's iPod in the cats' water.
Now I know there are tons of crafters out there with cats... what antics have they been up to? Leave me comments, please! (I'll be happy with dog stories, too!)
Look at that huge cat-sized open space on the desk!
Speaking of tasty new chicken recipes from the Kraft Foods website, we tried the Chicken in Creamy Pan Sauce tonight. Next time, we're doubling the sauce and serving it with egg noodles. Very tasty!
It's not just when I'm crafting that the cats are pests. Earlier this week we had our oldest cat, Miss Katy, groomed. Her long fur was turning into huge clumps of felt again. Steve could not leave the couch that night - she was on him like white on rice. He made the best of it by reading.... until:
Pixel makes a better door than a window. At least he settled down:
Look at our poor Katy! I hate that they gave her a lion cut. I know it's best for her, but she looks so sad! Steve noted today that Katy has "Flashdance" legwarmers, and he made her do the "Maniac" dance. She was not amused.
Surprisingly, Fe (our youngest kitty) hasn't been a pest lately... Oh, wait, that's right. She knocked over a basket in the kitchen which nearly landed Steve's iPod in the cats' water.
Now I know there are tons of crafters out there with cats... what antics have they been up to? Leave me comments, please! (I'll be happy with dog stories, too!)
Sunday, April 11, 2010
Experimental scrapping
This is a project I created last November, not too long after I got my Gypsy. I did post about this on the Cricut message board (http://www.cricut.com/messageboard/tm.aspx?m=5728235&mpage=1&key=�), but I want to include it here as an example of non-traditional scrapbooking.
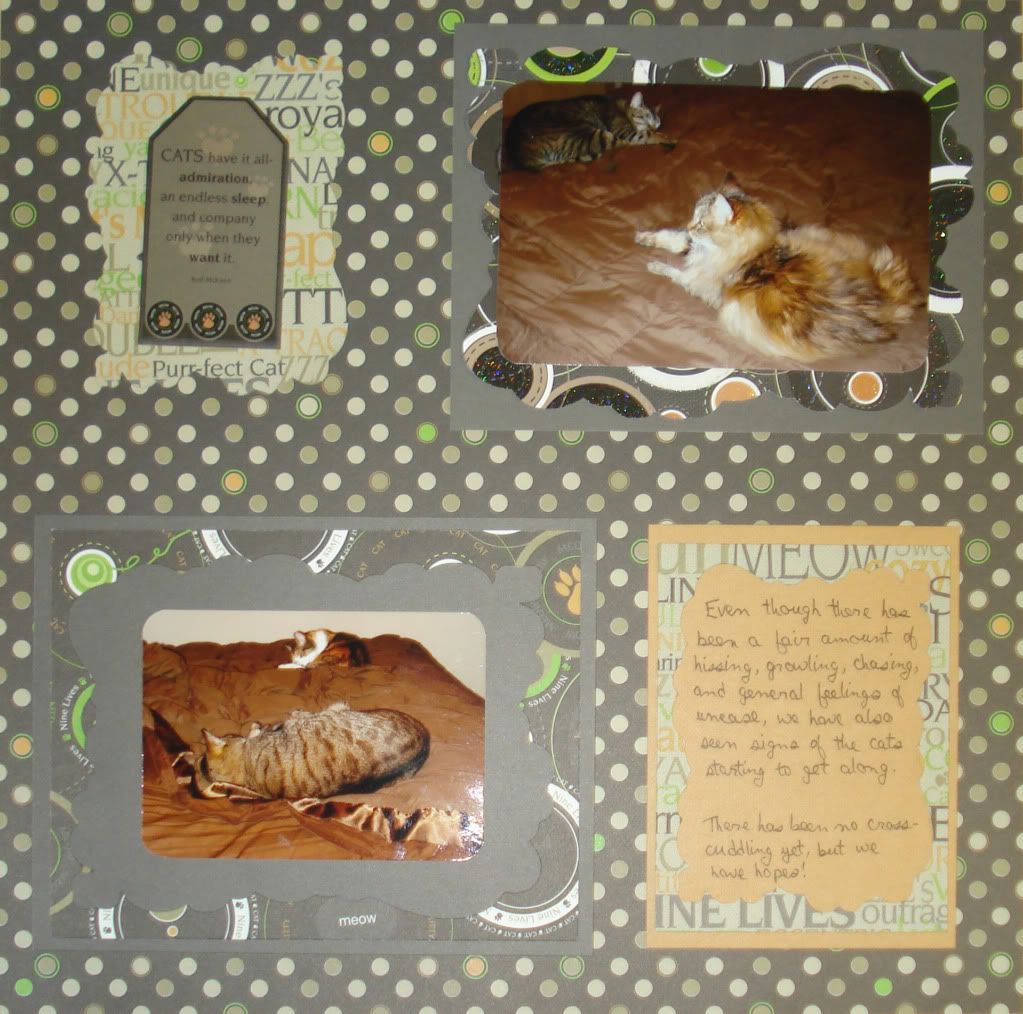
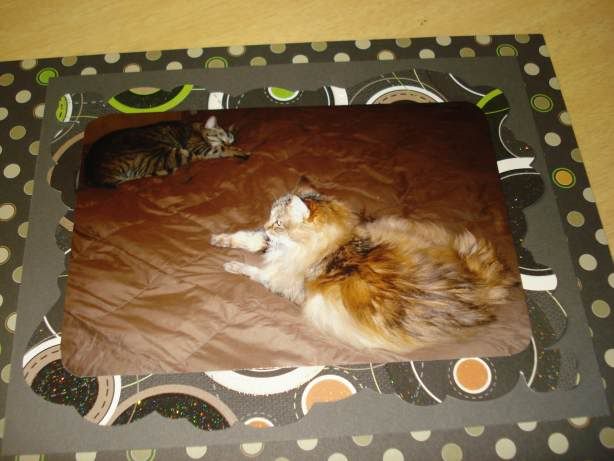
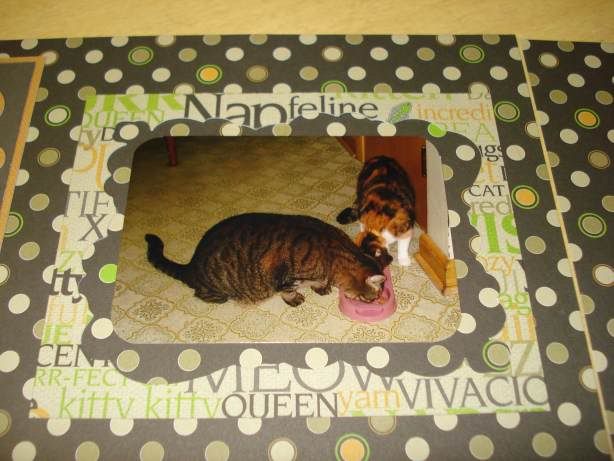
Steve and I have 4 cats (we each had two cats when we met), and we were able to catch glimpses of them starting to get along - my Pixel with his Fe, his Katy with my Pixel, my Simoon with his Fe. (Pixel and Fe are the youngest and the most easy-going). For the end of our "First year of marriage album", I wanted to show these pictures and created a double 12x12 layout, using a coordinated set of cat papers from Cloud9Design.
I have difficulties mixing patterned papers. I even bought Ali Edwards's book, A Designer's Eye 2, which helps you work with patterned papers, but I still have problems, even with papers like these that are MADE to go together. There are small dots, circles of different sizes, words all jumbled together, etc. That doesn't even take COLOR into account! The saving grace with this set of papers is that they are double-sided with solids on the back. I have used them before on other pages with the solid colors as the background, but for this set of pages I "Mixed Me Up"!
Here are the full pages:
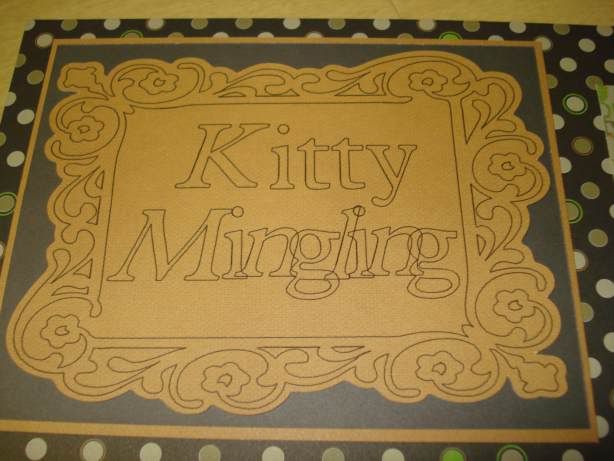
The pens that are meant to go with the Cricut die cut machine are really thick markers. QuicKutz has pens for their Silhouette that are thin but also happen to fit in the Cricut blade mechanism. I used the Gypsy (the handheld design tool for the Cricut) to create the title, overlapping the letters of "Mingling" to signify how our "families" are overlapping. The text is from the Plantin Schoolbook cartridge, both regular and italic, and the frame is from Home Accents. I drew the words and frame first then cut it out using the shadow shape of the frame:
I had tried to do a bigger shadow for layering behind, but with the little nubbins in the top left and lower right, it just didn't work. That sparked an idea, and I used differently sized pieces for mats and frames, flipping them over to use the solid side, which also flipped where the nubbins were.
Here is Pixel and Katy with the shape used as a mat:
And here is Pixel and Fe sharing a meal in a frame:
I tried to have the patterns and solids evenly distributed across both pages, which was difficult because of what paper I had left. I believe I made it work, however!
The tag in the upper left of the second page is also from Cloud9Design (this is how they getcha - embellishments to go with the papers! I think I bought them all...), and it reads, "Cats have it all - admiration, an endless sleep, and company only when they want it." That sums up this household!
Here's an update - we have had up to 3 cats sleeping with us at night, and there has still been no cross-cuddling. It's early days, though!
Steve and I have 4 cats (we each had two cats when we met), and we were able to catch glimpses of them starting to get along - my Pixel with his Fe, his Katy with my Pixel, my Simoon with his Fe. (Pixel and Fe are the youngest and the most easy-going). For the end of our "First year of marriage album", I wanted to show these pictures and created a double 12x12 layout, using a coordinated set of cat papers from Cloud9Design.
I have difficulties mixing patterned papers. I even bought Ali Edwards's book, A Designer's Eye 2, which helps you work with patterned papers, but I still have problems, even with papers like these that are MADE to go together. There are small dots, circles of different sizes, words all jumbled together, etc. That doesn't even take COLOR into account! The saving grace with this set of papers is that they are double-sided with solids on the back. I have used them before on other pages with the solid colors as the background, but for this set of pages I "Mixed Me Up"!
Here are the full pages:
The pens that are meant to go with the Cricut die cut machine are really thick markers. QuicKutz has pens for their Silhouette that are thin but also happen to fit in the Cricut blade mechanism. I used the Gypsy (the handheld design tool for the Cricut) to create the title, overlapping the letters of "Mingling" to signify how our "families" are overlapping. The text is from the Plantin Schoolbook cartridge, both regular and italic, and the frame is from Home Accents. I drew the words and frame first then cut it out using the shadow shape of the frame:
I had tried to do a bigger shadow for layering behind, but with the little nubbins in the top left and lower right, it just didn't work. That sparked an idea, and I used differently sized pieces for mats and frames, flipping them over to use the solid side, which also flipped where the nubbins were.
Here is Pixel and Katy with the shape used as a mat:
And here is Pixel and Fe sharing a meal in a frame:
I tried to have the patterns and solids evenly distributed across both pages, which was difficult because of what paper I had left. I believe I made it work, however!
The tag in the upper left of the second page is also from Cloud9Design (this is how they getcha - embellishments to go with the papers! I think I bought them all...), and it reads, "Cats have it all - admiration, an endless sleep, and company only when they want it." That sums up this household!
Here's an update - we have had up to 3 cats sleeping with us at night, and there has still been no cross-cuddling. It's early days, though!
Subscribe to:
Posts (Atom)