I am this close to being done with that triangle bracelet. Do you see how close together my fingers are? I am at the same place I was last night, but I have figured out the clasp attachment. There was a lot of discussion, tearing apart, and experimenting. All that's left is to stitch half a triangle on one side and two or three more on the other, and it's done. Tomorrow. It will be done tomorrow. Of course, as I'm writing this it's technically tomorrow, so that gives me some leeway. :D
But that doesn't give me a topic for tonight. Fortunately I had some new beads that were just begging to be used.
I love when bead stores give you a free gift with purchase. It could be a whole goody bag or just a tube of beads. It doesn't matter. It's nice to get something for free, but it's also a good way to experiment with beads you may not have thought to buy on your own.
One of the free tubes of beads I got from Knot Just Beads a few years ago were "Beads the leaf outta me":
They're pretty, but I'm fond of buying single-color, single-shape, single-size beads. Not only are these different sizes, shapes, and colors, but the holes aren't even in the same places. Some of the holes are front to back, some are left to right, and some are top to bottom. It's chaos! Oh - there are also yellow and brown beads in here, too. ::shudder:: I don't buy many yellow and brown beads. Steve loves yellows and browns and those sorts of colors, but I love purples (big surprise there), blues, pinks, and greens. Mostly purple, though. :)
Somehow I ended up with a few tubes of these leaves. Oh - I just looked it up. She gave them away in different goody bags for events I went to. The upshot was that I had a lot of these leaves and needed to do something with them.
I played around with them and the spiral stitch and ended up with my "Falling Leaves" design:
This design teaches spiral and how to adapt the spirally bits (that's the technical term) based on what kind and size of leaf you have. You can easily adapt it for different types of leaves or other beads. (If you'd like to purchase this tutorial, send $7 through PayPal to traci@creative-pursuits.biz with the note "Falling Leaves tutorial", and I'll e-mail it to you!)
Since I had such great success with the leaves, I'm more comfortable with bead mixes like this.
The most recent giveaway that Knot Just Beads had was on Good Friday. Since eating fish is a big Catholic tradition on the Fridays during Lent, Kim had a "Fish Special": a free tube of "Wishy Fishy" beads with purchase:
Since the fishies are on my usual purple background, you know I took advantage of this fish special. Each tube had one large fish and quite a number of small ones. I picked through the tubes and found this one with a yellow-green large fish that I thought was cute.
At this time I'm not planning a new design for the fish (I have my hands full right now with unwritten tutorials), but I wanted to do something special with them.
The first thing I did was make a pair of earrings that kind of look like they're on the line:
The blue beads are meant to be bubbles, and the silver bugles are the fishing line.
As I was making the earrings I had an idea for the bracelet. I was going to put it off, but I knew that tomorrow I'd be working on the triangle bracelet, and I need to get back to knitting the baby pullover I'm testing. I also didn't want to wait because I wasn't sure if what I wanted to do was going to work.
I wanted to simulate air bubbles coming up from the mouths of the fish (I have no idea what the possessive plural of "fish" is - fishes'?). I also wanted to use a more conventional technique than stitching or working with wire like I did the last few days (the wrapped-loop necklace and bracelet).
I grabbed beading wire (the kind used for regular stringing), crimp beads, and my Xuron 4 in 1 Crimper. I cut a piece of wire about 12 inches so I'd have plenty to work with. Although I did have enough, I would have felt more comfortable with another 3 inches or so. I got twitchy for the last two fish.
Here's the final bracelet:
Between each fish is a loop of seed beads. I strung three small seed beads and one bigger one. Holding the first two small beads tight against the fish, I looped the wire around and went through the second one again. Once that was tight, I added one more small seed bead before adding the next fish. Now that I'm looking at it again, the bubbles could be coming out of
either end of the fish. Oops! Do fish fart? Next time I'll add a few more seed beads before the next fish.
The bubbles like to move around, but when the piece is worn, for the most part they stick up like they're floating to the surface.
I think it's super cute.
Here's a zoomed out shot of the bracelet:
(There's nothing like using a piece of wire to put a bracelet on and seeing your pudgy hand in pictures to make you want to eat rice cakes for every meal.)
I have enough fish left over to make a necklace, but I'm not sure this technique would work for a necklace. I may have to break out the needle and thread and make one using the same technique as with the leaves.
Have you done any experimenting with free-with-purchase beads? I'd love to see what you've come up with! Send a picture or three to traci@creative-pursuits.biz, and I'll blog about it.
Thursday, April 24, 2014
Wednesday, April 23, 2014
Might as well finish the set (purple wrapped loop necklace)
Monday I made earrings. Yesterday I made a matching bracelet. Today when I was contemplating what I would do, I had two options: try to finish the triangle bracelet or make the necklace that matched the earrings and bracelet. Since I haven't quite figured out how to attach the clasp for the triangle bracelet (it really needs a name) and still have at least 4 more triangles to make, I decided to make the necklace. Once I'm finished blogging, I'll get to work on designing the clasp mechanism so hopefully I can show you a finished bracelet tomorrow.
If you recall from yesterday, I had nine of those purple glass beads left. There were five cylinders, three round ones, and one teardrop. I couldn't be completely symmetrical with that count, but if I pretended that the teardrop was round, I could. A teeny bit of asymmetry is nice every once in a while. I found some small round beads that matched really well. They're something between pink and purple and are transparent enough to blend in with the larger beads.
Yesterday I created the bracelet by starting with the clasp ends and working toward the center. For the necklace, I knew what I wanted the middle bead to be, so I worked out from the center. I interspersed a few of the small rounds between the bigger beads but remembered my mission was to use all of those purple glass beads.
Here's how it looked after a few segments:
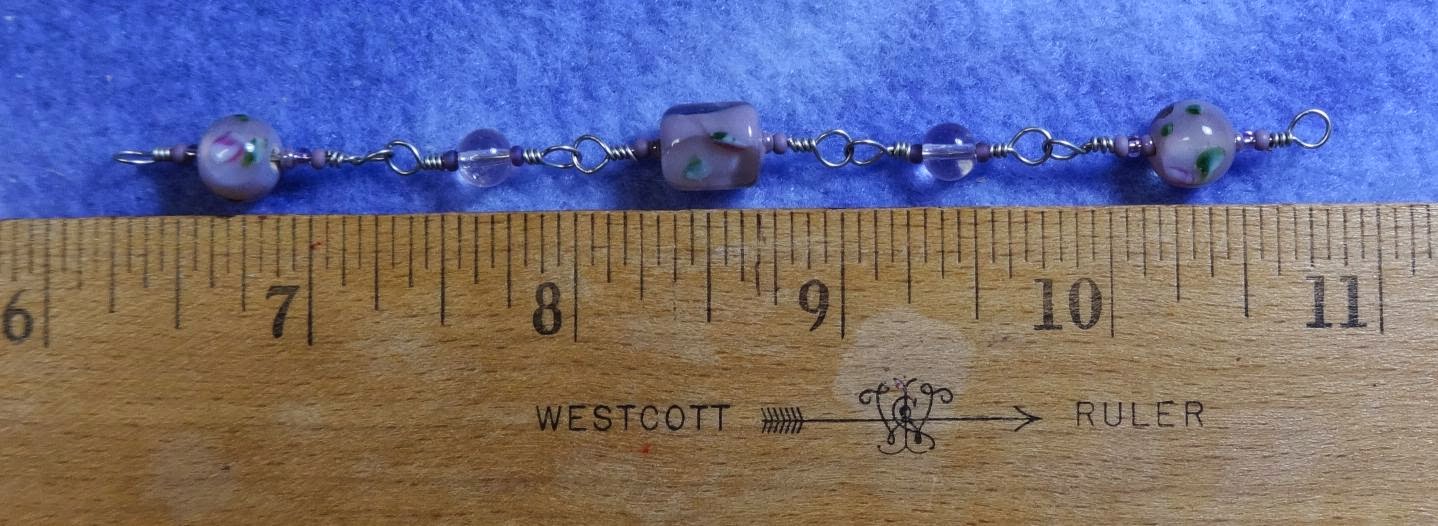
My necklace beading board is still missing, but my trusty ruler worked just fine for what I was doing. I centered the bead at the 8.5" mark because I wanted the necklace to be around 17" before I added the clasp so the finished necklace would be around 18".
Here's the entire finished necklace:
Here's a closeup of the middle bit on a lighter background:
Okay - now that those beads are used up, I'm going to go work on the triangle bracelet. Sawtooth? No, I just looked at sawtooth images. The bracelet doesn't have that kind of slant. It's more like a zigzagging zigzag. Anyone have any ideas? Leave a comment here, please!
If you recall from yesterday, I had nine of those purple glass beads left. There were five cylinders, three round ones, and one teardrop. I couldn't be completely symmetrical with that count, but if I pretended that the teardrop was round, I could. A teeny bit of asymmetry is nice every once in a while. I found some small round beads that matched really well. They're something between pink and purple and are transparent enough to blend in with the larger beads.
Yesterday I created the bracelet by starting with the clasp ends and working toward the center. For the necklace, I knew what I wanted the middle bead to be, so I worked out from the center. I interspersed a few of the small rounds between the bigger beads but remembered my mission was to use all of those purple glass beads.
Here's how it looked after a few segments:
My necklace beading board is still missing, but my trusty ruler worked just fine for what I was doing. I centered the bead at the 8.5" mark because I wanted the necklace to be around 17" before I added the clasp so the finished necklace would be around 18".
Here's the entire finished necklace:
Here's a closeup of the middle bit on a lighter background:
Okay - now that those beads are used up, I'm going to go work on the triangle bracelet. Sawtooth? No, I just looked at sawtooth images. The bracelet doesn't have that kind of slant. It's more like a zigzagging zigzag. Anyone have any ideas? Leave a comment here, please!
Tuesday, April 22, 2014
Purple wrapped loop bracelet
Today's project is a bracelet to match yesterday's Purple trio earrings.
Yesterday I talked about dangling a string of the glass beads from wrapped loops. I decided instead to cluster the beads on different lengths of headpins. For today's bracelet I decided to follow that original plan.
Using the bracelet beading board I've talked about before, I made a few units and set them down to measure:
The last time I used the bracelet beading board was for the pink cube bracelet I donated to the Cinderella project. I started in the middle for that bracelet and added beads to either side of the center bead.
For this bracelet, I decided to work from the outside in. That way I could see what the length was with the clasp on and evaluate what I was going to do next with every unit added to each side. My first attempt was just under 7", which seemed a little short to me. I cut apart one unit, remade it, and added one more unit with the slightly smaller round bead:
The bracelet is a bit over 7.5" now, which should be a good length for sale.
Here's a closer look at the finished bracelet:
I should mention that I used the Groovy looping pliers to make the wrapped loops. As I mentioned in my review, they are great to work with!
I talk a lot here about using up my old beads. I was hoping there would be enough of these beads to make a matching necklace, but I only have 9 left. I could make another bracelet (strung instead of with wrapped loops like this one), or I could take some other beads and make a necklace in the same style as this bracelet. I think I'm going to make a necklace. Even though I will put the pieces out for sale separately (instead of as a complete set), I like starting out with the option for someone to purchase all three pieces.
Yesterday I talked about dangling a string of the glass beads from wrapped loops. I decided instead to cluster the beads on different lengths of headpins. For today's bracelet I decided to follow that original plan.
Using the bracelet beading board I've talked about before, I made a few units and set them down to measure:
The last time I used the bracelet beading board was for the pink cube bracelet I donated to the Cinderella project. I started in the middle for that bracelet and added beads to either side of the center bead.
For this bracelet, I decided to work from the outside in. That way I could see what the length was with the clasp on and evaluate what I was going to do next with every unit added to each side. My first attempt was just under 7", which seemed a little short to me. I cut apart one unit, remade it, and added one more unit with the slightly smaller round bead:
The bracelet is a bit over 7.5" now, which should be a good length for sale.
Here's a closer look at the finished bracelet:
I should mention that I used the Groovy looping pliers to make the wrapped loops. As I mentioned in my review, they are great to work with!
I talk a lot here about using up my old beads. I was hoping there would be enough of these beads to make a matching necklace, but I only have 9 left. I could make another bracelet (strung instead of with wrapped loops like this one), or I could take some other beads and make a necklace in the same style as this bracelet. I think I'm going to make a necklace. Even though I will put the pieces out for sale separately (instead of as a complete set), I like starting out with the option for someone to purchase all three pieces.
Monday, April 21, 2014
Purple trio earrings
Today was another rough day - I've had a really bad headache that just won't go away. It's a little bit better than earlier, so I have hopes that in a few days I'll be my "normal" self again.
Instead of my usual "I feel like crap so I'm breaking out the One Step Looper for quick earrings", I decided to make some slightly more advanced earrings using wrapped loops.
Years and years ago I picked up these pretty purple glass beads with dainty roses in them. They came in three shapes:
At first I had wanted to stack them with the cylinder on the bottom, the round one in the middle, and the teardrop on top. I could do a wrapped loop for the bottom one, but the headpins I have aren't long enough for me to do wrapped loops on either end for the top and middle beads. Instead of grabbing wire, I opted to stagger the lengths of the headpins:
That picture is a little dark, isn't it? That was the best of about 15 pictures. Argh.
I used 11/0 seed beads to add some color and to make sure that the longest headpins would be the same length and the medium-length headpins would be the same length. If I had tried to eyeball it, the lengths would have been all over the place.
Instead of my usual "I feel like crap so I'm breaking out the One Step Looper for quick earrings", I decided to make some slightly more advanced earrings using wrapped loops.
Years and years ago I picked up these pretty purple glass beads with dainty roses in them. They came in three shapes:
At first I had wanted to stack them with the cylinder on the bottom, the round one in the middle, and the teardrop on top. I could do a wrapped loop for the bottom one, but the headpins I have aren't long enough for me to do wrapped loops on either end for the top and middle beads. Instead of grabbing wire, I opted to stagger the lengths of the headpins:
That picture is a little dark, isn't it? That was the best of about 15 pictures. Argh.
I used 11/0 seed beads to add some color and to make sure that the longest headpins would be the same length and the medium-length headpins would be the same length. If I had tried to eyeball it, the lengths would have been all over the place.
Sunday, April 20, 2014
This Easter Egg looks better
Happy Easter!
We had an eventful day today. We went out to dinner with my mother and stepfather (John) at a nice, high-end restaurant. Dinner was pleasant, but when we got to the car we found this:
The car on the right - the one perfectly within the yellow lines - is John's. Let's look at that from the front, shall we?
Thank goodness for iPhone cameras, huh?
The restaurant called the police and finally found the owner. She came out and said, "I don't remember doing anything like that. What time did you get here?" like John would have somehow wedged his car up on hers then crawled through the passenger side to get out. She maintained that she couldn't have done that without noticing (duh) and kept trying to figure out if she arrived before we did. Anyway, the officer said it definitely looks like the woman was at fault, but she couldn't issue a citation because it happened on private property. Ugh. Information was exchanged, and insurance companies will be contacted.
The damage isn't extensive, but it's the principle of the thing. Even if she hadn't noticed the hit, wouldn't she have noticed that she was way crooked and over the line as she walked behind her car to get to the restaurant? I guess it's good she was dim - if she had just moved her car, we wouldn't have known what happened.
Now onto to a happier, if much shorter, topic...
After yesterday's debacle, I decided to stitch an Easter Egg I knew would look a lot better:
This is from my Tubed Key Holiday collection. If I'd have thought about it, I could have stitched it yesterday so I could have worn it today. Oh, well. Now I have it for next year, or maybe I'll put it up for sale on Etsy when the time is right.
If you're interested in any of my Tubed Key tutorials (holiday or not) or kits, all of the information can be found here.
We had an eventful day today. We went out to dinner with my mother and stepfather (John) at a nice, high-end restaurant. Dinner was pleasant, but when we got to the car we found this:
The car on the right - the one perfectly within the yellow lines - is John's. Let's look at that from the front, shall we?
Thank goodness for iPhone cameras, huh?
The restaurant called the police and finally found the owner. She came out and said, "I don't remember doing anything like that. What time did you get here?" like John would have somehow wedged his car up on hers then crawled through the passenger side to get out. She maintained that she couldn't have done that without noticing (duh) and kept trying to figure out if she arrived before we did. Anyway, the officer said it definitely looks like the woman was at fault, but she couldn't issue a citation because it happened on private property. Ugh. Information was exchanged, and insurance companies will be contacted.
The damage isn't extensive, but it's the principle of the thing. Even if she hadn't noticed the hit, wouldn't she have noticed that she was way crooked and over the line as she walked behind her car to get to the restaurant? I guess it's good she was dim - if she had just moved her car, we wouldn't have known what happened.
Now onto to a happier, if much shorter, topic...
After yesterday's debacle, I decided to stitch an Easter Egg I knew would look a lot better:
This is from my Tubed Key Holiday collection. If I'd have thought about it, I could have stitched it yesterday so I could have worn it today. Oh, well. Now I have it for next year, or maybe I'll put it up for sale on Etsy when the time is right.
If you're interested in any of my Tubed Key tutorials (holiday or not) or kits, all of the information can be found here.
Saturday, April 19, 2014
Conceptual Easter egg
Happy day before Easter! When I was trying to decide what to blog about (because I haven't finished the triangle bracelet yet), I wondered if I could come up with something Easter related.
I thought an Easter egg might be possible, so I started digging through my Super Duos. I thought if I made Polka Dot beaded beads with cream on the ends and pastel blue in the middle, it might look like a partially dyed egg. I started stitching, and with just the blue it didn't really look like an egg. I added a stripe of purple and finished it up, and...
Hmm. No. Maybe if it was turned and on a different background?
Still no. Steve said, "If you know it's an Easter egg, it looks like an Easter egg, but otherwise it doesn't."
I've left the thread on there because I'm not sure if I'm going to cut it apart or hang it from an earring wire.
One thing I learned is that using Delicas on the ends makes the openings too small to put a headpin through.
What do you think? Post a comment here and tell me if it does or doesn't look like an Easter egg. Its fate rests it your hands.
I thought an Easter egg might be possible, so I started digging through my Super Duos. I thought if I made Polka Dot beaded beads with cream on the ends and pastel blue in the middle, it might look like a partially dyed egg. I started stitching, and with just the blue it didn't really look like an egg. I added a stripe of purple and finished it up, and...
Hmm. No. Maybe if it was turned and on a different background?
Still no. Steve said, "If you know it's an Easter egg, it looks like an Easter egg, but otherwise it doesn't."
I've left the thread on there because I'm not sure if I'm going to cut it apart or hang it from an earring wire.
One thing I learned is that using Delicas on the ends makes the openings too small to put a headpin through.
What do you think? Post a comment here and tell me if it does or doesn't look like an Easter egg. Its fate rests it your hands.
Friday, April 18, 2014
Review: "New" Fireline
When I first started stitching my friends told me that I should use fishing line - it's much stronger and easier to work with than beading thread for most applications. At the time, the only fishing line I knew about was that clear stuff that's hard to knot - monofilament. I bought some and stitched a spiral necklace using only seed beads with it. It was a little hard to work with, but the resulting spiral had some body and firmness to it that I liked.
It didn't take long for me to find out that my friends were talking about a different fishing line, and I didn't let on that I had misunderstood. Until now, that is. I hope they don't tease me too badly.
The fishing line they were talking about was Fireline, which is made by Berkley. The most common colors are Crystal (white) and Smoke (black). I was hooked (no, I really didn't mean to make a fishing pun) from the first time I stitched with it. Beading thread likes to fall out of my needle, and the resultant stitching doesn't feel very tight to me. Fireline gave my pieces a nice firmness (without being too firm like the monofilament was), and I could tug on it really hard and not worry about it breaking.
Fireline is so strong that it dulls ordinary scissors, so I've recommended using Xuron's 9180 High Durability "Fireline" Scissors (you can see my review of them here).
I like Fireline so much I include it in all of my kits, and I have sold the Fireline Scissors at shows and online (I only have two left, but if you'd like order, e-mail me at traci@creative-pursuits.biz, and I'll order more!)
So life was blissfully happy until the Fireline started disappearing off of the shelves. There was a nervous ripple around the beading community. Then the rumors started that there was a new formula that was coming out. Shortly after beaders got their hands on it, the chatter was about how the fisherpeople (we can't assume they're all men, you know) loved it, but the beaders hated it. Today I tried to quickly find something online to support either the happy fisherpeople claim or the sad beader claim, but I was unsuccessful. There is probably something somewhere, but I didn't want to spend the entire day looking. I have enough problems with time slipping away from me as it is.
With all that in mind, I am going to give you my review. Please keep in mind that this is my opinion and shouldn't be quoted as gospel. I have worked with the new Fireline (6 lb. test) extensively for a few weeks. Most of the time was with Smoke, but I have used Crystal a few times.
The first thing I noticed is that they changed the packaging. The old spools were in boxes, and the new ones are sealed up like batteries:
I am happy with this decision. I once bought some Fireline at Walmart, and if I hadn't glanced at the box's open window, I would have come home with some very thin monofilament. It looked like someone had swapped the spools out and bought Fireline at monofilament prices. The sticker had even been removed from the spool. I brought the box and spool to an employee and requested it be removed from the shelf, but a few months later it was still up there. I took the spool halfway out of the box and just laid it on the shelf in hopes that someone would notice it.
The next thing I noticed is that the spools are smaller:
On the surface this would seem to be a good thing - less waste and all that - but I liked to snap the spool into the cover of my beading Caboodle. It kept it out of the way until I needed it. The new one is much too small to do that. Maybe I could rig something with magnets or Velcro, or (more likely) I can just deal with it. People with the neat spool storage boxes (like this one) will have a lot of extra room inside.
Now onto the Fireline itself. As I mentioned, most of my testing was with the Smoke color. I do have a few thoughts about the Crystal color that I will share, but there will be no pictures. I tried taking pictures with the Crystal, but I couldn't get a good enough contrast.
Right away the Fireline feels different. The Crystal feels more twisted or bumpy, and the Smoke doesn't feel as smooth. Here is a strand of the old and a strand of the new Smoke Fireline:
There is a bit of a twist to the old, but the twist in the new is more pronounced. It also doesn't look quite as tightly twisted as the old.
At first when I started working with it I didn't notice a change. I had to rip out some stitching, and I didn't see a problem. However, I started having problems threading my needle. I'd take the needle out to either weave in an end or to take something apart, and the end of the thread frayed a lot sooner than I'd have expected.
Today I did a test. I took a needle and each piece of Fireline and threaded it and took the needle off five times. I wasn't gentle with either the old or the new. With the new, I started having trouble with the end fraying from the second threading. That doesn't always happen - sometimes it slips right through, but once it starts fraying, the only recourse you have is to snip off probably 1/2" of the end and try it again.
It wasn't just the end that was frayed, though:
Do you see all the little hairs on the new one? There's one on the old and a bunch on the new. I started worrying about my beadwork and looked at the thread I have coming out of my triangle bracelet. It's a relatively new thread, but it's been through one whole triangle unit, so it should show some signs of wear if normal beading would cause that. The only spot that showed a problem was where the needle had been:
Other than that, I didn't see any loose hairs or anything else disturbing.
Fraying can also occur when ripping stitching out. I've had a number of instances where I didn't have any problems, but it did happen one time with a new thread:
I had done a small amount of beadwork, realized I had screwed up, and I had to take it all apart. I snipped an inch or so past this point in the thread and started up again. This time I did it correctly (thank goodness).
I did the threading-needle test on the Crystal Fireline, too, and that seemed to fare better. I didn't have any problems getting the needle threaded (maybe my aim was more accurate this time), and I didn't see much fraying, even though I was pretty rough on it.
So, is the new Fireline as good as the old Fireline?
(I did beat that poor thread up pretty bad for that joke - you shouldn't have to worry about it fraying that much with normal beading practices.)
Even though the new Fireline isn't as good as the old one, I am not going to abandon ship. I still like it a lot more than regular beading thread. With the triangle bracelet I've been working on, I have pulled really hard on the thread on a number of occasions, and it hasn't snapped, so it seems as strong as before.
The big thing is the fraying. My recommendations are:
It didn't take long for me to find out that my friends were talking about a different fishing line, and I didn't let on that I had misunderstood. Until now, that is. I hope they don't tease me too badly.
The fishing line they were talking about was Fireline, which is made by Berkley. The most common colors are Crystal (white) and Smoke (black). I was hooked (no, I really didn't mean to make a fishing pun) from the first time I stitched with it. Beading thread likes to fall out of my needle, and the resultant stitching doesn't feel very tight to me. Fireline gave my pieces a nice firmness (without being too firm like the monofilament was), and I could tug on it really hard and not worry about it breaking.
Fireline is so strong that it dulls ordinary scissors, so I've recommended using Xuron's 9180 High Durability "Fireline" Scissors (you can see my review of them here).
I like Fireline so much I include it in all of my kits, and I have sold the Fireline Scissors at shows and online (I only have two left, but if you'd like order, e-mail me at traci@creative-pursuits.biz, and I'll order more!)
So life was blissfully happy until the Fireline started disappearing off of the shelves. There was a nervous ripple around the beading community. Then the rumors started that there was a new formula that was coming out. Shortly after beaders got their hands on it, the chatter was about how the fisherpeople (we can't assume they're all men, you know) loved it, but the beaders hated it. Today I tried to quickly find something online to support either the happy fisherpeople claim or the sad beader claim, but I was unsuccessful. There is probably something somewhere, but I didn't want to spend the entire day looking. I have enough problems with time slipping away from me as it is.
With all that in mind, I am going to give you my review. Please keep in mind that this is my opinion and shouldn't be quoted as gospel. I have worked with the new Fireline (6 lb. test) extensively for a few weeks. Most of the time was with Smoke, but I have used Crystal a few times.
The first thing I noticed is that they changed the packaging. The old spools were in boxes, and the new ones are sealed up like batteries:
I am happy with this decision. I once bought some Fireline at Walmart, and if I hadn't glanced at the box's open window, I would have come home with some very thin monofilament. It looked like someone had swapped the spools out and bought Fireline at monofilament prices. The sticker had even been removed from the spool. I brought the box and spool to an employee and requested it be removed from the shelf, but a few months later it was still up there. I took the spool halfway out of the box and just laid it on the shelf in hopes that someone would notice it.
The next thing I noticed is that the spools are smaller:
On the surface this would seem to be a good thing - less waste and all that - but I liked to snap the spool into the cover of my beading Caboodle. It kept it out of the way until I needed it. The new one is much too small to do that. Maybe I could rig something with magnets or Velcro, or (more likely) I can just deal with it. People with the neat spool storage boxes (like this one) will have a lot of extra room inside.
Now onto the Fireline itself. As I mentioned, most of my testing was with the Smoke color. I do have a few thoughts about the Crystal color that I will share, but there will be no pictures. I tried taking pictures with the Crystal, but I couldn't get a good enough contrast.
Right away the Fireline feels different. The Crystal feels more twisted or bumpy, and the Smoke doesn't feel as smooth. Here is a strand of the old and a strand of the new Smoke Fireline:
There is a bit of a twist to the old, but the twist in the new is more pronounced. It also doesn't look quite as tightly twisted as the old.
At first when I started working with it I didn't notice a change. I had to rip out some stitching, and I didn't see a problem. However, I started having problems threading my needle. I'd take the needle out to either weave in an end or to take something apart, and the end of the thread frayed a lot sooner than I'd have expected.
Today I did a test. I took a needle and each piece of Fireline and threaded it and took the needle off five times. I wasn't gentle with either the old or the new. With the new, I started having trouble with the end fraying from the second threading. That doesn't always happen - sometimes it slips right through, but once it starts fraying, the only recourse you have is to snip off probably 1/2" of the end and try it again.
It wasn't just the end that was frayed, though:
Do you see all the little hairs on the new one? There's one on the old and a bunch on the new. I started worrying about my beadwork and looked at the thread I have coming out of my triangle bracelet. It's a relatively new thread, but it's been through one whole triangle unit, so it should show some signs of wear if normal beading would cause that. The only spot that showed a problem was where the needle had been:
Other than that, I didn't see any loose hairs or anything else disturbing.
Fraying can also occur when ripping stitching out. I've had a number of instances where I didn't have any problems, but it did happen one time with a new thread:
I had done a small amount of beadwork, realized I had screwed up, and I had to take it all apart. I snipped an inch or so past this point in the thread and started up again. This time I did it correctly (thank goodness).
I did the threading-needle test on the Crystal Fireline, too, and that seemed to fare better. I didn't have any problems getting the needle threaded (maybe my aim was more accurate this time), and I didn't see much fraying, even though I was pretty rough on it.
So, is the new Fireline as good as the old Fireline?
Please send your hate mail to Steve - this was his idea
(I did beat that poor thread up pretty bad for that joke - you shouldn't have to worry about it fraying that much with normal beading practices.)
Even though the new Fireline isn't as good as the old one, I am not going to abandon ship. I still like it a lot more than regular beading thread. With the triangle bracelet I've been working on, I have pulled really hard on the thread on a number of occasions, and it hasn't snapped, so it seems as strong as before.
The big thing is the fraying. My recommendations are:
- Use shorter threads. I'm not saying to use a foot at a time, but if you're like me and use two or more "wingspans" of thread because you hate adding new thread, you'll be putting undue stress on the thread as you're pulling it through lots and lots of beads lots and lots of times.
- Don't reposition the needle too much. This is going to be tough for me - I start with a long thread and move the needle closer to the end as I go. But we saw what that does to the thread, so it's probably best to work with a shorter tail.
- If you have to rip out a lot of stitching, check the thread for frays. It might be a good idea to check it from time to time anyway for big projects. If the thread is frayed, weave it in and add a new piece that's free from frays.
Subscribe to:
Posts (Atom)