The Madison Art Glass and Bead Show is in less than a week! Where did the time go? I am going to be busy all week preparing, but I will not neglect you, my dear readers. Most of the blogs will probably be about samples I'm making and other preparations, so you can feel like you're preparing with me (but without all the work).
Remember the red mixed bead wire-wrapped key I showed you earlier in the month? I told you it was for the make 'n take event the Friday night of the show. I still need to make instructions, so I took process shots as I made a blue version:
Now I'm all set to write the instructions! Steve will help me cut wire, and I'm going to sit down now and bag beads.
Sunday, March 16, 2014
Saturday, March 15, 2014
Polka dot earrings
After all the blogging I've done this week (including the challenge and instructions for the beads I'm about to show you), I need a quick one! A truly quick one, not like yesterday's longer-than-I-anticipated quick post.
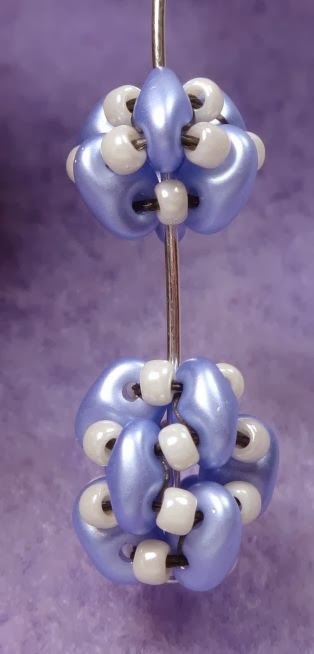
Today I made another Polka Dot beaded bead using the Pastel Light Sapphire Super Duos and the cream (#421) 11/0 seed beads to match one of my first samples. Using the 11/0s means I can put a headpin through the middle and make quick earrings using my one-step looper:
I'm really looking forward to playing with these beads more and making lots of projects with them! For full instructions on how to make the beads and the accompanying rope, click here.
Friday, March 14, 2014
Oh, no... BAD crystal! Very, very bad crystal!
An awful lot has happened this week, so today's post will be somewhat quick. If you haven't been here in a while, I've posted an Iliad-inspired earring challenge and free instructions for a Super Duo/seed bead rope and beaded beads. If you've missed either or both of those posts, please check them out!
Today I was all set to continue working on the funky Cobblestone Path bracelet I mentioned when packing for the LBS retreat. I started working on it on Monday then got busy with all the new designs. I'm not feeling well (again), so I took a nap this afternoon. When I woke up for some reason I looked at the jumble of jewelry on my nightstand and saw this:
Well, that's unfortunate. Crystals are known for having sharp edges, and sometimes threads break. Fireline is a strong thread, but a sharp edge can still cut it. From what I've heard, the new Fireline might not be as strong, but I haven't tried it yet. One way to guard against threads being cut is to have seed beads next to the crystal so there's not so much rubbing of thread against sharp edge, but as we can see in my piece, it's not foolproof.
Fortunately, when I make a piece like this I reinforce every stitch so it isn't loose and floppy. A side benefit is that when it breaks, I don't lose any beads. I took apart that row then had a decision to make:
I basically had three options: cut it all apart and put the beads back in my stash, tie off each of those threads and add just the one row, or remake the bracelet. Stashing it wasn't an option because I frequently wear this bracelet. It's a great accessory for nearly all of my purple tops (and I have a LOT of purple tops). I chose to completely remake the bracelet because the thread might be weak in other places. If I was smart I would have changed out the "bad" crystal for one with duller edges, but I didn't think of doing that until this:
Um... which one was it? Oh, never mind. I crossed my fingers and hoped for the best.
This was quite an adventure for me. I really, really like my beads in neat little piles. I'm a little OCD that way. When we play cards, I straighten them out when they get too wonky. It annoys everyone, but I can't help it. It's just so untidy. When I see people with beads in piles like this, my fingers twitch. Tonight, though, I decided to throw caution to the wind and pick through the pile. It wasn't too bad, but I did have a few stretches where I had to do a little hunting and pecking to find the bead I wanted.
When I was done remaking it, I had only lost one seed bead. Miracle of miracles, I knew right where the tube was, and I could finish the bracelet with no further drama!
If you like this design and will be at the Madison Art Glass and Bead Show, I'd love for you to take my class! It's on Saturday, March 22 from 6:00p to 8:00p. The cost is $50, which includes materials in one of four colorways. The above is not one of them. I'm using fire polish beads for the centers instead of crystals, so you'll never have to worry about the thread cutting (unless you take a pair of scissors to it).
Here are the kit colorways:
The same design looks so different with the different colors, doesn't it?
For more information and to register, visit the Madison AGAB class page and search for "Legs". That will get you to the right class. Hope to see you there!
Thursday, March 13, 2014
Waltz rope and Polka Dot beaded beads instructions
I've talked a few times this week about my "new" technique for stitching a rope using Super Duos and seed beads and how it's very similar to other designers' ropes. It's not exactly like theirs, though, so like I mentioned yesterday, I now feel comfortable writing up my instructions. However, I don't feel comfortable charging for those instructions, so I'm making them available for free right here!
The other designers who have Super Duo/seed bead ropes are Diane Fitzgerald and Doris Coghill. There may be more, but these are the only two I know of right now. Doris Coghill's is part of her "Twin Lariat" design. Diane Fitzgerald has her "Twin/Super Duo Bead Chain" posted on her website as a PDF, which also includes a flat chevron chain and a beaded bead.
The main difference between their ropes and mine is that my technique "steps up" like even peyote, and theirs does not. That makes their ropes spiral, and mine does not. There are a few other differences, but that's the main one.
Okay - now that my disclaimers are finished, on with the instructions!
Here are the Waltz rope (as a bracelet) and the Polka Dot beaded beads:
There are essentially three steps (with some sub-steps): the beginning, the middle, and the end. From those steps, you can make the full rope and both of the beaded beads.
Materials list:
That's it! Three simple steps, three SDs per row, and you have a Waltz or Polka (Dot)!
Note: If you use 15/0s for the beaded beads, you may not be able to put them on a headpin. You should still be able to stitch with them or put them on a thin beading wire. Use 11/0s if you want to put them on headpins or on a thicker beading wire.
Here are the two Polka Dot beaded beads using 15/0s and 11/0s, respectively, and with the 11/0 beads on a headpin:
Adding the clasp:
There are probably a zillion ways to add a zillion types of clasps, but here's how I add a snap clasp:
I hope you enjoyed these instructions! There are lots of possibilities for multiple colors and embellishments that I'll be exploring.
If you have any questions, please e-mail me at traci@creative-pursuits.biz.
To see what classes I'm teaching, visit my Creative Pursuits website for a current list. If you'd like to know how I am as a teacher and what my tutorials are like, please check out my Why you should take a class from Traci Otte blog post.
To see what design tutorials and kits I have for sale, either visit me at the Madison Art Glass and Bead Show in March, the Bead&Button Meet the Teachers Reception in June, at the Milwaukee Bead Show in October, or on Etsy.
The other designers who have Super Duo/seed bead ropes are Diane Fitzgerald and Doris Coghill. There may be more, but these are the only two I know of right now. Doris Coghill's is part of her "Twin Lariat" design. Diane Fitzgerald has her "Twin/Super Duo Bead Chain" posted on her website as a PDF, which also includes a flat chevron chain and a beaded bead.
The main difference between their ropes and mine is that my technique "steps up" like even peyote, and theirs does not. That makes their ropes spiral, and mine does not. There are a few other differences, but that's the main one.
Okay - now that my disclaimers are finished, on with the instructions!
Here are the Waltz rope (as a bracelet) and the Polka Dot beaded beads:
There are essentially three steps (with some sub-steps): the beginning, the middle, and the end. From those steps, you can make the full rope and both of the beaded beads.
Materials list:
- Super Duos (SD)
- 6 for the small Polka Dot beaded bead
- 9 for the large Polka Dot beaded bead
- Lots and lots for the rope - about 15 grams will make the 8.25" bracelet shown above
- Seed beads (seed) - I'm using 15/0s here, but you could also use 11/0s
- Very small amount needed for the beaded beads
- About 1.5 grams will make the bracelet shown above
- 6 lb. Fireline or the thread of your choice
- Beading needle
- Scissors
- Beading mat or other surface
- The beginning:
- Pick up 3 SD and 3 seed, alternating (SD, seed, SD, seed, SD, seed) and slide them down the thread, leaving about a 6" tail.
- Stitch through the first SD to form a circle and pull tight.
- Circle around 2-3 times to secure. For beaded beads, keep circling until it feels firm. Finish up after passing through an SD. Stitch through that SD's other hole to step up.
- Pick up 3 SD and 3 seed, alternating (SD, seed, SD, seed, SD, seed) and slide them down the thread, leaving about a 6" tail.
- The middle:
- Pick up 1 seed, 1 SD, and 1 seed and stitch through the empty (top) hole of the next SD.
- Repeat twice and pull tightly.
- For beaded beads, circle around 3-4 times to firm it up. If it's still loose, keep circling.
For ropes, circle around once. Technically you could skip this step, but I find it too loose if it's not done.
- With the thread exiting an SD, stitch through that SD's other hole to step up.
Small Polka Dots: Do step 2 once.
Large Polka Dots: Do step 2 twice:
Waltz ropes: Repeat step 2 until the rope is close to the desired length, taking into account the length of your clasp. This is how it looks after step 2 is done three times:
- Pick up 1 seed, 1 SD, and 1 seed and stitch through the empty (top) hole of the next SD.
- The end:
- Pick up 1 seed and stitch through the hole of the next SD.
- Repeat twice, pulling tightly so the SDs meet in the middle. Circle around 2-3 times to secure. For beaded beads, keep circling until it feels firm.
- For Waltz ropes, add a clasp (see below). For all, weave in both ends, tying a half hitch (overhand) knot to secure, and trim.
- Pick up 1 seed and stitch through the hole of the next SD.
That's it! Three simple steps, three SDs per row, and you have a Waltz or Polka (Dot)!
Note: If you use 15/0s for the beaded beads, you may not be able to put them on a headpin. You should still be able to stitch with them or put them on a thin beading wire. Use 11/0s if you want to put them on headpins or on a thicker beading wire.
Here are the two Polka Dot beaded beads using 15/0s and 11/0s, respectively, and with the 11/0 beads on a headpin:
Adding the clasp:
There are probably a zillion ways to add a zillion types of clasps, but here's how I add a snap clasp:
- Pick up 2 seeds, the loop of one end of the clasp, and 2 seeds.
- Stitch across the rope. If your thread is coming out of a seed, stitch through the SD across from it. If your thread is coming out of an SD, stitch through the seed across from it.
- Circle around until you get back to where you added the clasp and stitch through everything again at least once more to secure, then tie a half hitch knot, weave in, and trim.
I hope you enjoyed these instructions! There are lots of possibilities for multiple colors and embellishments that I'll be exploring.
If you have any questions, please e-mail me at traci@creative-pursuits.biz.
To see what classes I'm teaching, visit my Creative Pursuits website for a current list. If you'd like to know how I am as a teacher and what my tutorials are like, please check out my Why you should take a class from Traci Otte blog post.
To see what design tutorials and kits I have for sale, either visit me at the Madison Art Glass and Bead Show in March, the Bead&Button Meet the Teachers Reception in June, at the Milwaukee Bead Show in October, or on Etsy.
Wednesday, March 12, 2014
A challenge and my new "Waltz rope"
It's been a while since I've hosted a challenge. My mother-in-law has come up with a great one:
Send a picture of your "glowing and graceful three-drop clusters" to traci@creative-pursuits.biz to enter.
The deadline is March 31st, which gives us all plenty of time to think, shop (perhaps at the Madison Art Glass and Bead Show?), and create.
On April 1st, I'll post all of the pictures and open voting, probably through a Survey Monkey poll. On April 8th, I'll announce a winner.
The prize will be a $25 gift certificate to Fire Mountain Gems or any bead store (online or local) of your choosing (provided they have gift certificates for sale).
If you'd like to help me fund this challenge, please click on any ads over there on the right that interest you. Thanks!
Now on to regular blog business:
Karen (she who asked the Ott light question that was yesterday's blog post topic) called me this morning to thank me for the post and to tell me that she got a new job! It's only 12 miles from home, which is a lot shorter than other commutes she's had. I'm so happy for her! Congratulations, Karen! (And don't worry about waking me up. It was almost 10, and I should have been up anyway, insomnia or not.)
Remember the projects I've been working on lately that may have also been designed by other people? See the polka dot beaded beads post if you don't remember. After more research I've determined that mine is different enough that I feel comfortable that I'm not stealing from someone else. We've determined that it's more a technique than a design, so I'm not going to worry about it anymore. What I am going to do is write up my technique for my Waltz rope (because it's all in threes) and my Polka Dot beaded beads (because they're faster versions of the Waltz rope) and post it here for anyone who's interested. With luck I'll be able to do that tomorrow.
My friends looked at me askance when I told them the names (Waltz and Polka Dots), but unless anyone has any better ideas, the names stand. If you do have a better idea, e-mail me at traci@creative-pursuits.biz.
To hold you over until I can write things up, here's my finished "Waltz rope" bracelet:
Update: The instructions have been written and are available here.
Eek! It appears to no longer be Wednesday. I guess I'd better get to bed!
I've been reading the "The Iliad", and was interested in a description of a pair of earrings that the goddess Hera wore: "And in her pierced lobes she put a fine pair of earrings, Glowing and graceful three-drop clusters." The Greeks used gold and rock crystal. I issue a challenge to create a pair of earrings that a goddess could wear to seduce Zeus!I'm not sure how comfortable I am discussing Zeus-seducing with my mother-in-law, but I think it's a fine challenge! I'll see what I can come up with, and I'd like to see what you come up with, too.
Send a picture of your "glowing and graceful three-drop clusters" to traci@creative-pursuits.biz to enter.
The deadline is March 31st, which gives us all plenty of time to think, shop (perhaps at the Madison Art Glass and Bead Show?), and create.
On April 1st, I'll post all of the pictures and open voting, probably through a Survey Monkey poll. On April 8th, I'll announce a winner.
The prize will be a $25 gift certificate to Fire Mountain Gems or any bead store (online or local) of your choosing (provided they have gift certificates for sale).
If you'd like to help me fund this challenge, please click on any ads over there on the right that interest you. Thanks!
Now on to regular blog business:
Karen (she who asked the Ott light question that was yesterday's blog post topic) called me this morning to thank me for the post and to tell me that she got a new job! It's only 12 miles from home, which is a lot shorter than other commutes she's had. I'm so happy for her! Congratulations, Karen! (And don't worry about waking me up. It was almost 10, and I should have been up anyway, insomnia or not.)
Remember the projects I've been working on lately that may have also been designed by other people? See the polka dot beaded beads post if you don't remember. After more research I've determined that mine is different enough that I feel comfortable that I'm not stealing from someone else. We've determined that it's more a technique than a design, so I'm not going to worry about it anymore. What I am going to do is write up my technique for my Waltz rope (because it's all in threes) and my Polka Dot beaded beads (because they're faster versions of the Waltz rope) and post it here for anyone who's interested. With luck I'll be able to do that tomorrow.
My friends looked at me askance when I told them the names (Waltz and Polka Dots), but unless anyone has any better ideas, the names stand. If you do have a better idea, e-mail me at traci@creative-pursuits.biz.
To hold you over until I can write things up, here's my finished "Waltz rope" bracelet:
Update: The instructions have been written and are available here.
Eek! It appears to no longer be Wednesday. I guess I'd better get to bed!
Tuesday, March 11, 2014
Ott lights
I'm still developing all of those ideas I told you about yesterday. I showed the designs to a few friends, and it caused a huge upheaval in my plans. It seems that my rope is not completely unique. It looks a lot like what two other designers have done, but on closer inspection of one of them, my technique is a little different. It might be the case with the other designer's rope, too. I'll do a bit more research and get back to you with the results.
The other design I was working on has also possibly been done. A friend said she saw it on Etsy, but I can't find it there or anywhere else online. I'm going to keep designing and hope that it's different enough that no one gets upset.
So while I've been working away like a busy little bee, I don't have anything new I want to show you at this time. Fortunately, my friend Karen from Virginia (hi, Karen!) asked me a question about Ott lights in an e-mail yesterday, so I'm going to talk about that.
Before I do that, I have an addition to Sunday's blog post on good online sites for bead shopping. Marilee Rockley, a friend and a world-renowned (I assume) tatting authority, recommends Bello Modo. She said, "I like their selection of Vintaj and their steampunk buttons! They also have many kinds of beads and crystals." I've added all that to the list. Check out this steampunk tatted belt she just made with items from Bello Modo! If you have any sites to add, please leave a comment or send me an e-mail.
Now, finally, here's Karen's question:
Outside the mound of snacks is a ring of Ott lights. Cords and extension cords are everywhere, and it's a lovely mess.
Here's what I replied back to Karen with a little more tossed in now that I've had some more time to think about it and to do some editing. I'm including some pictures of my own lights. Be warned - even though I've done a lot of cleaning, my desk is still a "lovely mess". From what I understand, it's good for creativity to have a messy desk, so I'm not fretting about it, especially since now I have lots of space to work.
See? Pixel in all his enormity is lounging comfortably on my desk, and I still have lots of space to work. Wow. That picture really does look like he's huge with a tiny, tiny head. That can't be right.
Back to the topic! Yes, Ott lights are really wonderful, especially in a room where there isn't a lot of light, like an open beading room or a living room. It reduces eyestrain, and the colors are true to life. Other lights cast yellowish tints, and it's harder to pick colors if you can't see how they'll really look out in the world. You can read more about Ott lights and the difference between the different types of lighting here. You can see the biggest difference in the "white" backgrounds.
The lights in the retreat pictures are the best ones for taking places because they fold up. Here's mine folded and in use:
It's compact with a great light, and this model has a handle that folds down if it bugs you sticking up like that. If you're going to bring a light like this to a group outing, you might want to put your name on it. The same goes for your tools and your beading triangles (which tend to get tossed around from person to person in beading frenzies). You want to make sure you're going home with what you came with!
There are battery operated LED Ott lights, but those tend to be too dim for many people. They're great in a pinch - dim light is better than no light - but I wouldn't rely on them for heavy use.
There is quite a range of Ott light styles from desktop versions to ones that sit on the floor. A few have a bit of storage (like this one), and a few have magnifiers (like this one). JoAnn Fabrics has a really good selection of Ott lights on their website. This one is what I have on my desk, but I had to tape a piece of paper around the dome because I have problems with unshaded lights shining in my eyes. It works well, but it's not really portable.
Even that much light is too hard on my eyes. Fortunately, the dome swivels, so when I work I swivel it down so my eyes are happy. The base is good for stashing various items that I don't want to lose in the maelstrom my desk usually is: loose beads, finished pieces, things that need to be fixed, tags I need to put back on jewelry for sale, and other miscellaneous things.
If you're going to get a new light, I'd wait until you have a 50% off coupon or when there's a sale. They're high quality, so they're pricey. It's not something you'd buy without a little bit of planning. Make sure that the light you buy is an Ott light, because the JoAnn site's desk and table lamp page lumps all the lights together. There are some non-Ott lights that say they're good for crafting, but I can't vouch for them. JoAnn Fabrics frequently has Ott light sales, so you wouldn't have to wait long. Ooh - it looks like right now they're having a 50% off sale! Double ooh - look at this purple portable one!! I wouldn't have to put my name on that one, would I? Hmm... my birthday is only 5 months away. (hint hint)
Another option is to get a daylight bulb at the hardware store and put in a lamp you already have. I bought a few $10 desk lamps at Target and light bulbs to go in them so I can (hopefully, eventually) take good pictures. I'm still struggling with that, but it's not the light's fault. The one thing to keep in mind with desk lamps is to not get bulbs that would go over the recommended wattage. You can, but monitor your lamp closely (so it doesn't get too hot) and only use it for short periods of time.
Here's my Target $10 desk lamp with a daylight bulb in it:
Lately I've been using both desk lamps for taking quick pictures:
It's not ideal, but I think the extra lighting has helped.
Oh - if you're going to buy an Ott light floor lamp, I recommend reading the reviews. I've been beading at night while we watch TV, but it's far too dim in there. I went searching online and really liked this one - it would have gone really well with the new colors in our living room, but after reading the reviews I decided to not get it. A number of people loved it, but a number of people said it was too top-heavy and kept falling over. Oops! I was saved by further searching by my mother. They had an extra floor lamp in the attic, and the color of it was perfect! Steve bought a new lampshade at the Fleet Farm of all places, and it's gorgeous. I need a three-way daylight bulb for it still, but even without that it's been a big improvement.
If you've been reading this and wondering if Steve and I get checks from the Ott light folks, I'm sad to tell you that we do not. Our name is Otte (pronounced Ottee), not Ott.
Oh, geez. I've been blogging so long that there's been a "changing of the cats":
This is why my floor is so messy.
The other design I was working on has also possibly been done. A friend said she saw it on Etsy, but I can't find it there or anywhere else online. I'm going to keep designing and hope that it's different enough that no one gets upset.
So while I've been working away like a busy little bee, I don't have anything new I want to show you at this time. Fortunately, my friend Karen from Virginia (hi, Karen!) asked me a question about Ott lights in an e-mail yesterday, so I'm going to talk about that.
Before I do that, I have an addition to Sunday's blog post on good online sites for bead shopping. Marilee Rockley, a friend and a world-renowned (I assume) tatting authority, recommends Bello Modo. She said, "I like their selection of Vintaj and their steampunk buttons! They also have many kinds of beads and crystals." I've added all that to the list. Check out this steampunk tatted belt she just made with items from Bello Modo! If you have any sites to add, please leave a comment or send me an e-mail.
Now, finally, here's Karen's question:
I hope that you are getting rested from your bead retreat. I really enjoyed the pictures. I see a lot of the attendees have Ott lights. I've heard about them but I don't really know a great deal of information. Are they wonderful?She's referring to the picture I had on my Spring retreat day 1 post:
Outside the mound of snacks is a ring of Ott lights. Cords and extension cords are everywhere, and it's a lovely mess.
Here's what I replied back to Karen with a little more tossed in now that I've had some more time to think about it and to do some editing. I'm including some pictures of my own lights. Be warned - even though I've done a lot of cleaning, my desk is still a "lovely mess". From what I understand, it's good for creativity to have a messy desk, so I'm not fretting about it, especially since now I have lots of space to work.
See? Pixel in all his enormity is lounging comfortably on my desk, and I still have lots of space to work. Wow. That picture really does look like he's huge with a tiny, tiny head. That can't be right.
Back to the topic! Yes, Ott lights are really wonderful, especially in a room where there isn't a lot of light, like an open beading room or a living room. It reduces eyestrain, and the colors are true to life. Other lights cast yellowish tints, and it's harder to pick colors if you can't see how they'll really look out in the world. You can read more about Ott lights and the difference between the different types of lighting here. You can see the biggest difference in the "white" backgrounds.
The lights in the retreat pictures are the best ones for taking places because they fold up. Here's mine folded and in use:
It's compact with a great light, and this model has a handle that folds down if it bugs you sticking up like that. If you're going to bring a light like this to a group outing, you might want to put your name on it. The same goes for your tools and your beading triangles (which tend to get tossed around from person to person in beading frenzies). You want to make sure you're going home with what you came with!
There are battery operated LED Ott lights, but those tend to be too dim for many people. They're great in a pinch - dim light is better than no light - but I wouldn't rely on them for heavy use.
There is quite a range of Ott light styles from desktop versions to ones that sit on the floor. A few have a bit of storage (like this one), and a few have magnifiers (like this one). JoAnn Fabrics has a really good selection of Ott lights on their website. This one is what I have on my desk, but I had to tape a piece of paper around the dome because I have problems with unshaded lights shining in my eyes. It works well, but it's not really portable.
Even that much light is too hard on my eyes. Fortunately, the dome swivels, so when I work I swivel it down so my eyes are happy. The base is good for stashing various items that I don't want to lose in the maelstrom my desk usually is: loose beads, finished pieces, things that need to be fixed, tags I need to put back on jewelry for sale, and other miscellaneous things.
If you're going to get a new light, I'd wait until you have a 50% off coupon or when there's a sale. They're high quality, so they're pricey. It's not something you'd buy without a little bit of planning. Make sure that the light you buy is an Ott light, because the JoAnn site's desk and table lamp page lumps all the lights together. There are some non-Ott lights that say they're good for crafting, but I can't vouch for them. JoAnn Fabrics frequently has Ott light sales, so you wouldn't have to wait long. Ooh - it looks like right now they're having a 50% off sale! Double ooh - look at this purple portable one!! I wouldn't have to put my name on that one, would I? Hmm... my birthday is only 5 months away. (hint hint)
Another option is to get a daylight bulb at the hardware store and put in a lamp you already have. I bought a few $10 desk lamps at Target and light bulbs to go in them so I can (hopefully, eventually) take good pictures. I'm still struggling with that, but it's not the light's fault. The one thing to keep in mind with desk lamps is to not get bulbs that would go over the recommended wattage. You can, but monitor your lamp closely (so it doesn't get too hot) and only use it for short periods of time.
Here's my Target $10 desk lamp with a daylight bulb in it:
Lately I've been using both desk lamps for taking quick pictures:
It's not ideal, but I think the extra lighting has helped.
Oh - if you're going to buy an Ott light floor lamp, I recommend reading the reviews. I've been beading at night while we watch TV, but it's far too dim in there. I went searching online and really liked this one - it would have gone really well with the new colors in our living room, but after reading the reviews I decided to not get it. A number of people loved it, but a number of people said it was too top-heavy and kept falling over. Oops! I was saved by further searching by my mother. They had an extra floor lamp in the attic, and the color of it was perfect! Steve bought a new lampshade at the Fleet Farm of all places, and it's gorgeous. I need a three-way daylight bulb for it still, but even without that it's been a big improvement.
If you've been reading this and wondering if Steve and I get checks from the Ott light folks, I'm sad to tell you that we do not. Our name is Otte (pronounced Ottee), not Ott.
Oh, geez. I've been blogging so long that there's been a "changing of the cats":
This is why my floor is so messy.
Monday, March 10, 2014
Productive insomnia and new polka dot beads
My best time for designing seems to be in the wee hours of the night. I don't know why - maybe it's because the house is quiet. Maybe it's because I don't feel distracted by any number of things like I do during the day. Steve would say that it's because my sleep cycle is off, and nights are my best time to work.
Whatever it is, many times if I start experimenting with beads late at night, I come out of it with a new design. Last night, I hit the jackpot. If I can get everything to work, that is. At this point I have two very simple beaded beads designed and a possibility much more. One is a very simple rope for bracelets or necklaces, and the others are flat variations that start with the same step as the others.
Since I'm not sure what's going to work and what isn't, I'm only going to show you the beaded beads. I'm calling them "Polka dot beads" because they're all in threes and they're quick to make. (If that doesn't make sense, check this wikiHow video out.)
Everything I made is with Super Duos and either 11/0 or 15/0 seed beads. Super simple but cute (I hope)!
Here are the smallest beaded beads (15/0 seeds are on the left and 11/0s are on the right):
Here are the two larger beads:
The 15/0s look tighter, but if I use the 11/0s I can put a headpin through them:
That's all the time I have today. I got sick of only being able to work in a 6"x6" area (again), so I've been cleaning off my desk. More on this tomorrow if I'm successful!
Subscribe to:
Posts (Atom)