This is the third installment of my 2013 LBS Challenge bracelet, "My Milwaukee: A Triptych". If you missed the previous parts, you can catch up here: Part 1 and Part 2.
For a quick refresher, here's the finished bracelet:
Today I'm going to talk about each of the straps of the bracelet - the "fish art" and our house. After the center section (Fish Fry & a Flick), the other two sections were much easier.
For the left side of the bracelet I chose to recreate art found along Milwaukee's River Walk:
I knew I wouldn't be able to duplicate it but knew I'd get pretty close. I found blue curved glass tubes on the Fire Mountain Gems website and knew I'd make the fish from polymer clay.
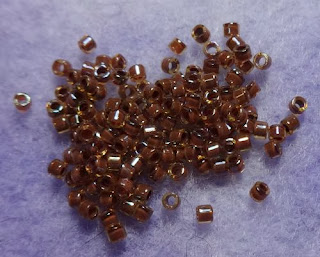
I had no idea the hardest part would be to find a brown to match the brick. I bought three different colors of Delicas online that I thought would work (2 possibilities for the brick and one for the mortar), but they were all too orange. I looked in two local stores, but nothing was even remotely close - these had too much red, those had a tinge of green. There was nothing close in Delicas, round seed beads, bugles, tilas, or any smallish bead. I finally decided on DB-287, Cinnamon Lined Topaz Luster Delica beads:
They're far too dark and had a luster I didn't want, but time was ticking away, and I had to get stitching. I paired it with two lighter colors for the mortar - one with a luster finish and one with matte for variety - and I stitched the bricks on:
They're not perfectly straight, and each brick could have been a bit wider, but I think for an art piece they turned out just fine.
There was just a bit of difficulty making the fish. I had wanted the holes to be mouth-to-tail, but every time I tried doing that the fish squished up. I decided to make two holes across the body of the fish, and that worked out much better.
I used my thumbnail to make the ridges along the fish. After baking, Steve painted the ridges and eyes with some black paint, and I was ready to go!
I determined where the waves and fish should go, then I discovered another problem - how was I to get a needle into the curved glass tubes? Fortunately I use my needles until they break, so I was able to find one that had the perfect curve to it:
After stitching the waves and fish on, I noticed something annoying:
Those waves were not lying down! More frantic discussions with Steve, and we decided to glue them down. No, it's not an elegant solution, but I really didn't have any other choice.
I had a heck of a time getting them to stay down, and even after I found a bead and glass glue that worked the waves still have a tendency of popping up when the piece is handled too much.
After stitching the bubbles on, that part of the bracelet was finished:
Now for the other strap - our house. As I mentioned in Part 1, I moved here because of marrying the love of my life. I love our house, everyone who's in it, and that it's in such a wonderful city. I'm glad I was able to include it in my piece.
Because I couldn't find a good, clear shot of the front of the house and didn't want Steve to know what I was doing, I took a picture of it with my cell phone when I came home from buying the brown beads for the bricks. The picture isn't the best, but it was perfect for my purposes:
It gave me a good idea of the shape of the front of the house. As with the other parts of the bracelet, I knew I couldn't reproduce it perfectly, but I knew it'd be pretty close. I drew out what I wanted with pencil then stitched the outline and started filling the spaces in:
At about this point I realized there's much more brick than green to the house, so I made a slight adjustment to the bottom part so it would look like the brick and have bushes in front. They're actually stitched on top of the "brick" for a more dimensional look.
That area to the right that's not stitched is where the straps overlap. Any beads there would not be seen when the bracelet was worn, and they would probably interfere with how the bracelet fits, so woo hoo! There's a big area where I didn't have to do anything but add the snaps!
I stitched the sky like I stitched the water - with curves to represent air currents. The smoke coming from the chimney is supposed to be a heart, but it looks like a goal post. That's what happens when you use Delicas instead of smaller beads that can be manipulated a little easier.
That's it for today! Come back next Tuesday for the last installment on finishing the bracelet up.
Subscribe to:
Post Comments (Atom)


No comments:
Post a Comment